Caffeine: the most potent artificial intelligence drink!

Caffeine: the most potent artificial intelligence drink!
Deep in the Lair of the Perpetually Curious Fox
Showing posts with label bark tanning. Show all posts

Wednesday, 11 April 2012

Processing White tail hide into (part III) ... grain off bark tanned leather!


Well folks, after a long while ... I'd say I've finished with the WT hide! Sorry or the long wait, ladies and gents ... spring kinda sprung unexpectedly here and I got busy starting seeds for the vegetable patch!

After about 60-ish days in the tea (I've also added some spruce bark tea to get the more golden highlights and the preservative qualities) the hide was taken out, washed in mild soap (in a washing machine, if you must know!) and rinsed.


Dove body soap (1/3 cupful) with a squirt of betadine surgical scrub.
 Let the hide drip off the excess water, and in the meantime, make yourself some leather mayo. Again, I'm using 1/3 liquid soap and 2/3 olive oil to make 1 cup of leather mayo emulsion.                                    


Just so it can cover the hide, I've diluted it in half a litre of WARM (not hot) water. Work, agitate, pummel, massage, rub, stir, etc for 30 minutes. Kinda wring it the best you can, let it drip off excess dressing, then repeat the work/agitate/pummel again. Then let it sit in the dressing for an hour.


After an hour, take it out of the dressing and let it drip off the excess overnight.


After dressing the hide, I folded it and plonked it in the freezer overnight. Took it out the next day, let thaw outside (8 deg C in the sun that day) let it dry off excess moisture from drippy slippery hide to just damp, and let it freeze outside at night, and prepare to work it the next day.


Even with all the holes and missed grain patches, it looks pretty darn good.
After letting it freeze dry overnight, it still contained a fair amount of water in it. Think of a bath towel after a trip to the swimming pool. Not sopping wet, but it is heavy with moisture. Here's where you'll need a fair amount of OCD ... softening a hide can take upwards of 8 to 12 hours of working it! Of course, you don't have to do it all in one sitting --- roll it up and put in a plastic baggie and into the freezer when you're done for the session.

The hide contains just enough moisture that it WON'T freeze solid - more like a very stiff pair of un-broken jeans. For working the hide, I lashed a canoe paddle onto the deck's steps and used the edge. You can also lace the hide onto a frame and work it with a paddle in your hands -- but I like to be able to rub n' fluff the hide in my palm in between edge working. Plus a hide on a frame won't fit in a freezer all that well .....


Just so I have a quantifiable way to determine the "dryness" of a hide, I weighed it before working, and after working. Once the weight stabilised, it is truly dry! I cannot emphasise how important it is to work the hide till it's completely dry -- most people stop working the hide too soon, and as the fibres dry out (without movement) it'll harden into stiff, plank-like quality! Good rule of thumb is to continue working for another hour when you think you're done ... or until the weight stays constant.

After 2 hours of working ... 1.362 kg


After 6 hours of working .... 0.743kg. Nearly half of it's original weight was water!
After 8 hours of working ... only 3g difference. Yup it's dry. Bear in mind that you also scrape a heck
of a lot of membrane off the hide when you work it ... so you'll lose maybe 2-3 grams of fibres per 2 hours.

Once it's dry, I change technique ... and used a deer scapula for finishing. The way I do it is to sit on half of the hide, lift the edge with my left hand until you have a bit of tension, then use the scapula in my right hand to scrape/fluff the stubborn areas like the back, neck and edges into the softness I want - in this case as soft as a broken in denim fabric feel, as I'm thinking of making a quiver and bow case.


It's funny how well the deer scapula fits in my hand and works so well to fluff up the fibres!  

 
Once you've got the degree of softness you want (of course, if it's still not soft enough, you can always use a spray bottle to re-dampen it and rework), it's time to finish off the flesh side with a pumice stone. Working on an edge kinda make the fibres a bit rough on the flesh side ... so to make it smoother out comes the pumice stone. Drape the hide on your thigh (flesh side up) and rub lightly with pumice stone until it's smooth. Don't over pumice - or you'll make a hole in the hide!


Rough un-pumiced on the top half, smooth silky suedey pumiced on the bottom half.
Yeaa ... I kinda fail at graining the hide because I used a kukri (hence the holes) and missed a few patches on the grain side, but these patches just scrapes off easily with your fingernails after softening ... and kinda adds an interesting character of light coloured patches.

Grain side. Nice golden brown with the odd light tan patches from bad graining.

However, the flesh side looks amazing! Maybe I should finish off the grain side with the pumice stone, too, to even the surface a bit more.

Silky suede smooth!

Soft enough to sew without pre-punching with an awl, yet stiff enough to hold it's shape once sewn into ...
dunno yet. Quiver and bowcase, maybe?
The trimmings are not wasted either. They'll make fantastic ammo or coin pouches. Maybe a deery something for my niece.


So my verdict? For my First Ever Hair Off, Grain Off, Non-Commercial Chemicals Involved Tea Tanning ... definitely do it again. Need a bit more practice in degraining (a proper drawknife would help!) to stop poking so many holes in it ... but yup, B+ for this hide!


Saturday, 28 January 2012

Processing a White Tail buck hide into .... [still undecided!]

Got a bit tweaky (bored and restless) so I decided to thaw out the white tail buck hide that's been sitting in the freezer for a couple of months. This time I'm attempting to process and tan it without salt curing the hide, just to properly document it.


Fleshing the Hide

There's a reason why leather work and butcheries in various cultures are usually relegated to the lowest castes; it can be a very gory process complete with excessive slathering of blood, tissue fluids, bodily goo, and if you're unlucky enough to work with a less than fresh hide, the perfume of putrefying flesh.

Be thankful for small mercies, that's my advice. A freshly thawed hide (provided you freeze it as soon as you skinned it off the animal) does not smell nasty. It does still, however, have a lot of fresh tissue goo, blood, etc. which is one of the reasons I prefer to salt cure a hide and let nature do it's work for me in breaking down the icky stuff.

Ideally, one should use a flesher beam and a proper fleshing tool. I am a great believer in the K.I.S.S principle (Keep It Simple, Stupid!) so all I used for fleshing this critter was my good ole knife (the edge dulled with use)  and a 2x2 piece of cedar. Works fine once you know the technique.

Just use the dull-ish edge to get a working edge of the membrane and "push" it off the skin. How dull should the knife be? Dull enough that you don't cut your own skin if you run the edge on your hand. This is so you can apply a lot of pressure on the hide to move the goo but not cut the skin.


Short break is needed!

There, all clean. All it takes is a dull knife, a piece of wood with rounded edges and a lot of goo scraping for 90 minutes
WASHING and DRYING

Then the fleshed and de-membraned hide is washed to get rid of most of the blood and surface goo, and clean the fur of "pollution". Don't worry too much about getting the rest of the goo out. It'll come out easier when you soak it later for dehairing. Once "kinda" clean, dry it out as soon as you can before anything has a chance to rot and stink.


In the meantime, I trimmed a piece of belly skin with the hair on to see what's the best way to "slip off" the hairs without using special chemicals.


So into the bucket of room temperature water, with a bit of borax added in (just to cut the oils)


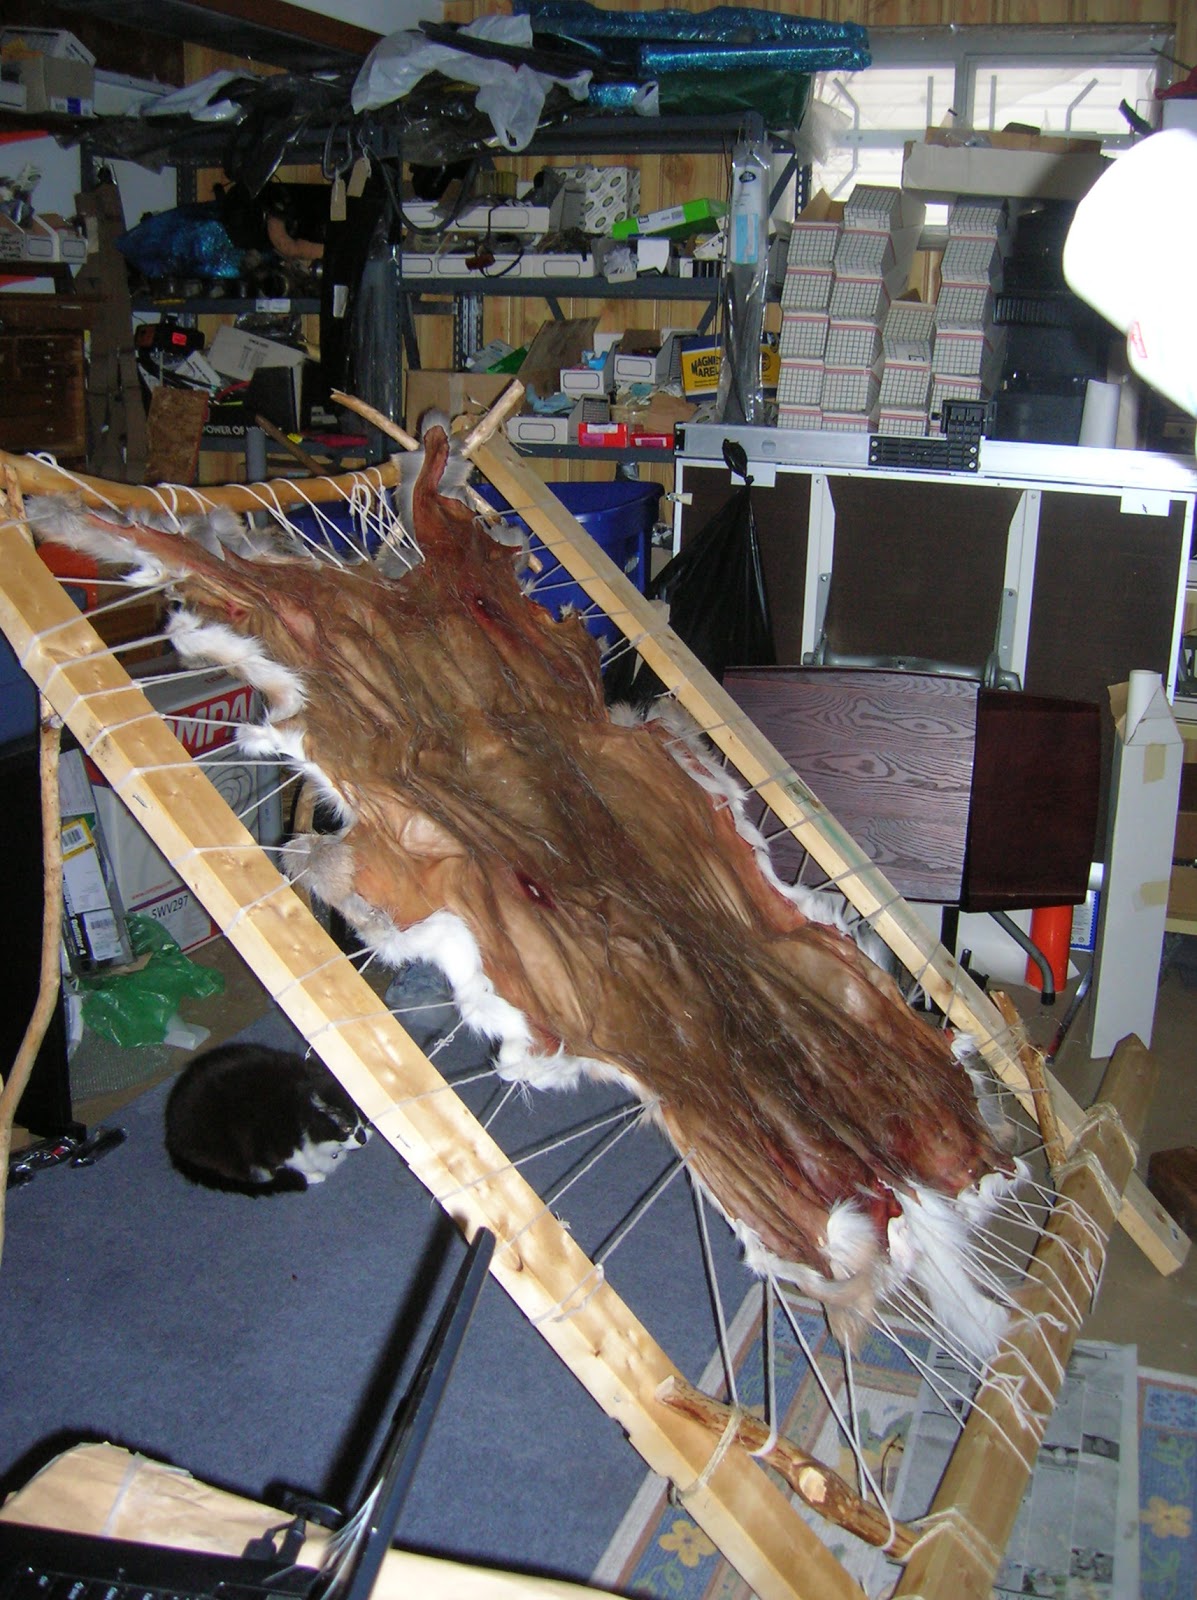
In the mean time, the rest of the hide is loosely framed so that the edges dry properly without curling up.

Bamboo needle makes things so much easier.

Laced up in a warm, dry, lotsa air circulation place.
Cat likes to sit under the frame and pretend it's a Lean to
SOAKING AND DEHAIRING/GRAINING


Back to the belly skin in the bucket, 3 days later.....


The hair has started to slip! Using the same method as "fleshing", you can easily scrape off the hair AND the grain layer in this particular piece. If you're planning to bark tan the skin, leave the grain on. Of course, you can bark tan a grain off skin, but it'll be less water resistant. The grain helps the leather to repel water naturally.

For making buck skin, the grain is taken off. Once soaked for 3 days, the grain and hair just slides off with a blunt edge. No nassssty chemicals like Ca(OH)2 is needed, really, but if you like to have things easy, sure, lime it. Just make sure you rinse and neutralised all the lime outta the hide afterwards.


Re-scrape the flesh side while you're at it. Lotsa Hide Snot oozes out of the fibres in the soaking.
Once scraped mostly off the grain and hair, and removing superfluous Hide Snot, wash and rinse to get a wet sheet of unprocessed deer skin. Just for the hell of it, I just plopped this wet skin into a tub full of tea (yes, as in tea leaves).

Look! Alien Goo!

Tannin turns Alien Goo into partially tanned leather.
In the meantime, the rest of the hide on the frame has dried, so it was unlaced and stored for the moment while I debate with myself on whether to bark tan or brain tan the rest of it!


Gigantic Deer Jerky!
TO BE CONTINUED .....


Deer hock pouch
Deer hock pouch, iteration 2; with belt loop
How to skin deer legs for hockskins
Bark tanning hair on deer hide
How to remove the pasterns and coffin bone from a deer foot
Salt Curing deer hides for storage
How to degrease deer bones for making tools
Soap/Oil tanning hoof-on, hair-on, Mule Deer hockskin

Saturday, 31 December 2011

Softening the bark tanned deer hide

Decided to finish the bark tanned hide project. Technically, I could have let it be as it is now, it's tanned and won't spoil, but I'd like it to be a bit softer and lies down flatter. I'm sure the cat would agree with me, too.

Goosey Lucy on the deer hide. The hollow deer hair is VERY warm, as this fat cat can testify.

First of all, we make the dressing solution, if you don't have raw deer brains handy you can substitute with a mixture of 1/3 soap and 2/3 oils.


1/3 liquid soap (hand soap works fine, as do shower cream) and 2/3 oil. Any oils, really, I'm using olive oil.

Shake it well until it emulsifies.

Should have the consistency of thick cream/runny mayonnaise. It doesn't hurt to be runnier, than thicker.

If you're working on an already really damp, small project piece like the deer hock skin, then just rub in the thick leather mayo in as is. I just find that diluting the "leather mayo" with equal amount of water and shaking it well makes it easier to paint on using a brush. Plus, the extra water helps the hide take in the oil in the mixture. 

Then, grab that bark tanned hide, and spray water on the tanned flesh side with an atomiser, or just use a damp sponge to dampen the surface. The "leather mayo" will absorb better when the hide is damp, plus, we're going to roll it up and it's never a good idea to roll dried hide as it'll crack and damage the grain layer and start shedding hair.

Tools of the trade: paintbrush, jar of diluted leather mayo, and an atomiser.
Once you've sprayed the flesh side and get it fairly damp, paint on the diluted leather mayo. Don't be stingy, you can always make more of the leather mayo. Paint away; the hide should suck up the emulsion pretty quick.


There will be areas that probably needs some "help" in getting the emulsion into the collagen fibres - you can either use a smooth rock to press it in, or using a blunt wooden implement .... you know, like a STICK lol.

Work the emulsion in well - it needs to reach the collagen fibres throughout the whole hide.

If you've worked it in well, the flesh side should take a darker colour. Don't worry if there's areas that are a bit stubborn, just make sure that you've covered the whole hide with as much emulsion to make it nice and damp and slightly "shiny" with oil. 

Now, grab a towel, soak it in hot water, and try your best to wring out excess so it doesn't drip. Lay it lengthwise onto the oiled hide so that it covers half of the hide. Fold the other side over onto the towel, so you kinda making a hide/towel/hide sandwich. That way the oiled flesh side is in contact with the damp, hot towel.
Notice how shiny the flesh side looks after the oiling?
Now roll it up! Don't worry if it doesn't roll up properly at first. Take your time - you can always re-roll it tighter when the hide has sucked up enough moisture and becoming less cardboard like and more thick blanket like.
Deer burrito!
Leave the deer burrito overnight with the towel rolled up inside. Check again and re-roll tighter and soak more water into the towel as necessary. The heat from the hot water helps the collagen fibres to relax and makes the oils penetrate deeper .... think of the "hot oil treatment" for dry hair. Don't use water that's too hot, obviously! You want to warm the leather, not cook it!

Rolled tighter! More hot water!


While waiting for the hide to hydrate fully and soften up, get 4 long pieces of wood, and start making a frame.
Make sure the frame is bigger than the hide!
Then place the hide centred on the frame lying on the floor. Since we're not really doing any scraping as such, like scraping off flesh or hair, it's not too compulsory to have the hide laced super tight. Just make sure it's tight enough laced so you can work out the creases. The hide should shrink a little as it dries, so keep that in mind, too.


It's easier to poke holes in the edge of the hide for lacing if you wet it first.


Poke a hole into the hide, say 1cm from the edge. 

Use a bent paperclip with a loop at the end and poke through the hole into the hair side. Catch the string in that loop and pull it back to thread the string into the whole.


Tie off the end onto the frame and continue process of poking holes and lacing for about 4 or 5 loops, then tie it off to the frame. Repeat on all sides of the frames, so you centre the hide properly. You can always re-tighten and re-lace later, so don't go too nuts with it yet. You want to make sure you laced the hide as flat as possible, stretching out all creases.

5 anchor points to centre properly.
OK, here's the hide on the frame with the frame propped up. I'm going to stop now as my fingers are getting tired! Will continue .....

Here's some update on the hide. I finished lacing it a couple of days ago:

You may notice that the some of the edges actually drapes over the frame; this is because I wanted to save some of the edge pieces as unsoftened bark tan (they're the really thick bits - neck, bit of the leg) for some over things. The main body piece will be softened.
Now make some more of the leather mayo, and dilute it with water. Grab a paintbrush or a sponge and start slapping it on. Again, don't be stingy. It should suck up the good stuff very quickly, now being stretched on the frame.


How much emulsion do you need to paint? Depends on how soft you want it to be, how much creases you need to work out, how quickly you work, etc. The second painting uses up about 400ml of emulsion, as I have a lot of creases to smoothen, from the rolling.

At this point, you can either let it dry as is, to get a stiff-ish flat rug, or work it with a tool to soften it a bit more. If you do decide to work it with a tool, make sure you sew up all the holes or you might end up tearing the holes into bigger holes ... well you get the idea.


To soften, I decided to to make and use a deer scapula (shoulder blade) that's been cleaned and degreased. I would have reshaped it a bit more and have a wooden handle for it, but for this hide, I'll just use it as is. Once degreased the bone should dry very well with little oily residue seepage, and hence less chance of rancid fat smells. You have to remember that bone marrow is a very fatty substance, not to mention extremely delicious! Don't waste it!

Cleaned and degreased deer scapula.
Here's what it looks like now that it's softened. It lies flat, and can be rolled and folded easily. Not exactly velvety, robe soft, but good enough for a bedroom rug


Other links that might interest you:


Deer hock pouch
Deer hock pouch, iteration 2; with belt loop
How to skin deer legs for hockskins
Bark tanning hair on deer hide
How to remove the pasterns and coffin bone from a deer foot
Salt Curing deer hides for storage
How to degrease deer bones for making tools
Soap/Oil tanning hoof-on, hair-on, Mule Deer hockskin
Alum tawing white tail hair on neck skin 
Processing green deer hide into .... 
Wild Foods compilation