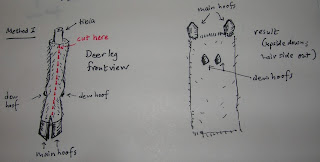
In skinning several deers this past couple of years I noticed how nice and thick the deer hock skins are. This year I salvaged the hocks to try get the skins to egg/brain tan, and learn how to remove the bone inside the hoof so I can preserve it.
First step, is of course, getting a deer leg. My first try in skinning a hock, I didn't really document the process very much, until a friend pointed out that he's been trying without much success and would appreciate a run through of the process
 |
| Start with a white tail deer hock |
Here is where I waved a magic wand, and like Blue Peter proclaim: "Here's one I made earlier!" It requires a certain technique and self restrain to skin a hock, as there is very little meat and fat between the innards and the skin ... and with a sharp knife you can really slice the leg skins (not to mention yourself) into bits. The leg skinning tutorial will be written up and posted in a couple of days :)
 |
| What they look like after skinning. I left the main hoofs on the bone, only have the dew hoofs attached to the leg skin |
So what did I do with the skins? Well, I've got 4 from the white tail buck ... and just replicating some process used on the mule buck hide I tanned earlier, I decided to salt it and dry it; leave it to cure for at least a couple of months before I flesh, tan and work it. I prefer to work hides as soon as they're skinned though, but with meat to butcher it's best to leave 'em be. You don't necessarily have to salt it; some people even just air dry the skins while waiting for a warmer day to process it.
 |
| Hock skins laid flat, flesh side up, and covered in salt. Don't be stingy with the salt, either! |
Took about a week (in nearly freezing temperatures) for the hock skins to dry up. Be sure you put them somewhere magpies can't reach! I nearly lost one of them to a birdy, before it decided that the skins are too salty for consumption.
 |
| After a week outdoors; dried nicely eventhough the temperature is about freezing. |
With it dried, it just put them in a bag and stash it somewhere in the store room :) I considered storing it outside, but mice have a habit of nomming dried hides, I was told.
This is what they look like when dry: the hide colour is preserved ( so far) and they're as hard as plywood! Some people just flesh it and turn it into hair on rawhide and make stuff, but I figure I might as well use them as test skins for different tanning method.
 |
| Once dried, they're hard as wood! |
They look really nice!
 |
| Dew hoofs. |
Tutorial on how to remove hoof from leg bone
Ok, now here comes the tutorial bit. First of all, like any good engineer, I tried to get a blueprint of the anatomical structures in a deer foot. Since I can't really find a proper "deer foot diagram" I substituted a horse foot anatomy pic form a
miniature horse grooming website here.
 |
| Actually this is an anatomical drawing of a horse's foot, but since it's close enough in structure to deer, it'll have to do. |
|
Now, we get the hoofed, skinless leg from above, a sharp knife and a whetstone. It might get a bit messy, so put some newspaper underneath, unless you're working outside with magpies to clean up the bits after you.
 |
| Hoofs on the bone, knife and whetstone. And yes, that is a rubber band on the haft. Helps with my grip. |
My cat always gets a bit *feral* when I work with deer bits indoors. They fancy themselves big wild tigers, instead of fluffy cuddle cat when they get a sniff of deer.
 |
| Cat decided to be a Nosy Ned and get into the way. |
After shooing the fluffiness away, take the deer leg with the hoof pointing forward and start pushing the blade into the space between the skin and bone. Takes a bit of work with a 3 week old hoof, I imagine it would be much easier to do when the leg is fresh. It's like trying to cut through rubber.
 |
| Running the blade along the inner surface of the hoof. Think of running a blade around a (very rubbery) cake in it's tin to dislodge it. |
When you reach the middle of the two hoofs, very carefully try to poke the knife blade between the two long pastern bones (refer diagram above) and the hoof cartilage of the two hoofs without damaging the flap of skin holding the hoof.
 |
| Run the blade between the skin and the long pastern bones. Think about the fold of skin between fingers ... |
Continue sliding the blade tip all around the bone (short pastern) and go as deep into the hoof as possible. The idea is to detach the cartilage gluing the coffin bone the the hoof, without causing too much of a mess of the hoof.
 |
| You're cutting through some really rubbery cartilage here - sharp, relatively strong blade is recommended. |
If your hoof is fresh, the easier the process should be, as the cartilage and tendons will be quite soft still. If it's about three weeks old, it gets really tough and rubbery. If you dried the hocks, rehydrate them first! In the picture below I've worked the blade down and gently twist the knife to expose the top of the short pastern bone.
 |
| Since the hoof is relatively fresh (only 3 weeks old) it is flexible enough to "give" as you twist the blade to loosen the hoof from the coffin bone (refer to anatomy pic) |
The joint of the short and long pastern is roughly above where the hide ends and the hoof begins.
 |
| View from the back of the leg: Exposing the flexor tendon connecting the long and short pastern |
Just because I'm curious about the anatomy, I decided to slice through the plantar cushion and hoof pad of that particular hoof, just to see if I can locate the navicular bone, which marks the joint between short pastern and coffin bone.
 |
| Cutting through the rubbery footpad of the hoof to expose the joint connecting the short pastern and coffin bone. You don't really have to do this, but I just wanted to see how deep within the hoof the joint is. |
Peeling back the hoof pad (very nice rubbery thing! I wonder if I should glue some at the bottom of moccasins for traction?) exposes the coffin bone and short pastern joint. Just so I can have a better grip on the project, I decided to separate this two, cutting neatly through the joint.
 |
| Cutting away a flap of hoof pad to expose the navicular bone. At this point I decided to cut away the hoof from the leg bone at that joint. |
 |
| The joint of the short pastern exposed after you cut away most of the cartilage under it. |
 |
| Hoof is detached! |
The hoof (with coffin bone still in it) is detached from the leg, but still attached by a flap of skin at the front. Now that I know roughly how deep the joint is, I do the same with the other hoof without cutting through the sole or removing the hoof pad.
 |
| Do the same with the other hoof, but without cutting the flap on the hoof pads. |
A few minutes later .... I got two hoofs with coffin bones inside, all detached from the leg. At this point I chucked the leg bone back into the freezer for getting the deer Neatsfoot oil some other day.
 |
| Both hoofs out. |
Once the short pastern is out of the way, it's much easier to work the blade around the "rubbery cake" inside the hoof. I was thinking of using a scalpel at this point, but too lazy to get up (LOL) so I just resharpened my knife and work it. To be honest, I think the scalpel blade would have broken with the kind of pressure I'm putting. I gotta admit it takes a bit of work and technique to get the coffin bone out. That's why I figure I practice on this leg before I work on a full hockskin attached.
 |
| Now it's more sliding the blade along the inner surface of the hoof to loosen the coffin bone from the hoof. Takes a bit of trial and error, but finally got there! |
It's kinda satisfying when the coffin bone finally popped out of the hoof. Some people actually resort to using a couple of pliers (one holding the hoof, and the other gripping the bone) and twisting,
like they do here or even to
slicing the bottom of the hoof (remove the sole) and getting to the coffin bone that way. Others boil the whole leg with hoof and then once all the tissues are cooked, pull out the bone like one removing a loose tooth!
 |
| Hoofs and their coffin bones |
Now we got two hollow hoofs with bits of cartilage and gore in it.
 |
Now to clean up the cartilage still stuck inside the hoof.
|
Just to avoid unnecessary smellies from developing, I popped the two hoofs in a bowl full of hot, soapy (laundry detergent) water overnight. The next day, rinse it out, hopefully all blood would have soaked out, and you're left with just white gelatinous cartilage inside the hollow.
 |
| After soaking in hot, soapy water overnight |
Not that much left, but I wanted it to be fully cleaned, so back to work!
 |
| Just eyeballing where and how I should scrape the cartilage |
This time I used a really really sharp mini chisel that I bought for carving horn/antlers and scrape the cartilage out.
 |
| Tool of choice: mini chisel that's been sharpened to razor sharpness |
 |
More bits out.
|
Once you've got most of the cartilagenous bits out, it's OK to let it air dry. All the soaking in hot soapy water, and scraping should minimise smellies.
What it looks like right now, once it's fully dry I'll use a rounded file to scrape away the dried cartilage, and voila! you have a nice clean hollow deer hoof to play with!
Other links that might interest you:
Deer hock pouch
Deer hock pouch, iteration 2; with belt loop
How to skin deer legs for hockskins
Bark tanning hair on deer hide
Softening bark tanned hair on deer hide
Salt Curing deer hides for storage
How to degrease deer bones for making tools
Alum tawing white tail hair on neck skin
Soap/Oil tanning hoof-on, hair-on, Mule Deer hockskin
Processing green deer hide into ....