
Decided to finish the bark tanned hide project. Technically, I could have let it be as it is now, it's tanned and won't spoil, but I'd like it to be a bit softer and lies down flatter. I'm sure the cat would agree with me, too.
First of all, we make the dressing solution, if you don't have raw deer brains handy you can substitute with a mixture of 1/3 soap and 2/3 oils.
If you're working on an already really damp, small project piece like the deer hock skin, then just rub in the thick leather mayo in as is. I just find that diluting the "leather mayo" with equal amount of water and shaking it well makes it easier to paint on using a brush. Plus, the extra water helps the hide take in the oil in the mixture.
Then, grab that bark tanned hide, and spray water on the tanned flesh side with an atomiser, or just use a damp sponge to dampen the surface. The "leather mayo" will absorb better when the hide is damp, plus, we're going to roll it up and it's never a good idea to roll dried hide as it'll crack and damage the grain layer and start shedding hair.
Once you've sprayed the flesh side and get it fairly damp, paint on the diluted leather mayo. Don't be stingy, you can always make more of the leather mayo. Paint away; the hide should suck up the emulsion pretty quick.
There will be areas that probably needs some "help" in getting the emulsion into the collagen fibres - you can either use a smooth rock to press it in, or using a blunt wooden implement .... you know, like a STICK lol.
Now roll it up! Don't worry if it doesn't roll up properly at first. Take your time - you can always re-roll it tighter when the hide has sucked up enough moisture and becoming less cardboard like and more thick blanket like.
Leave the deer burrito overnight with the towel rolled up inside. Check again and re-roll tighter and soak more water into the towel as necessary. The heat from the hot water helps the collagen fibres to relax and makes the oils penetrate deeper .... think of the "hot oil treatment" for dry hair. Don't use water that's too hot, obviously! You want to warm the leather, not cook it!
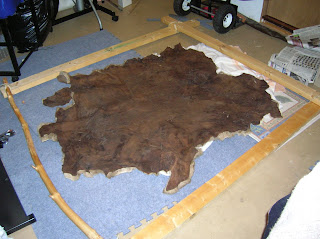
Then place the hide centred on the frame lying on the floor. Since we're not really doing any scraping as such, like scraping off flesh or hair, it's not too compulsory to have the hide laced super tight. Just make sure it's tight enough laced so you can work out the creases. The hide should shrink a little as it dries, so keep that in mind, too.
 Use a
bent paperclip with a loop at the end and poke through the hole into the
hair side. Catch the string in that loop and pull it back to thread the
string into the whole.
Use a
bent paperclip with a loop at the end and poke through the hole into the
hair side. Catch the string in that loop and pull it back to thread the
string into the whole.


Tie off the end onto the frame and continue process of poking holes and lacing for about 4 or 5 loops, then tie it off to the frame. Repeat on all sides of the frames, so you centre the hide properly. You can always re-tighten and re-lace later, so don't go too nuts with it yet. You want to make sure you laced the hide as flat as possible, stretching out all creases.
OK, here's the hide on the frame with the frame propped up. I'm going to stop now as my fingers are getting tired! Will continue .....


You may notice that the some of the edges actually drapes over the frame; this is because I wanted to save some of the edge pieces as unsoftened bark tan (they're the really thick bits - neck, bit of the leg) for some over things. The main body piece will be softened.
 |
| Goosey Lucy on the deer hide. The hollow deer hair is VERY warm, as this fat cat can testify. |
First of all, we make the dressing solution, if you don't have raw deer brains handy you can substitute with a mixture of 1/3 soap and 2/3 oils.
 |
| 1/3 liquid soap (hand soap works fine, as do shower cream) and 2/3 oil. Any oils, really, I'm using olive oil. |
 |
| Shake it well until it emulsifies. |
 |
| Should have the consistency of thick cream/runny mayonnaise. It doesn't hurt to be runnier, than thicker. |
If you're working on an already really damp, small project piece like the deer hock skin, then just rub in the thick leather mayo in as is. I just find that diluting the "leather mayo" with equal amount of water and shaking it well makes it easier to paint on using a brush. Plus, the extra water helps the hide take in the oil in the mixture.
Then, grab that bark tanned hide, and spray water on the tanned flesh side with an atomiser, or just use a damp sponge to dampen the surface. The "leather mayo" will absorb better when the hide is damp, plus, we're going to roll it up and it's never a good idea to roll dried hide as it'll crack and damage the grain layer and start shedding hair.
 |
| Tools of the trade: paintbrush, jar of diluted leather mayo, and an atomiser. |
There will be areas that probably needs some "help" in getting the emulsion into the collagen fibres - you can either use a smooth rock to press it in, or using a blunt wooden implement .... you know, like a STICK lol.
 |
| Work the emulsion in well - it needs to reach the collagen fibres throughout the whole hide. |
If you've worked it in well, the flesh side should take a darker colour. Don't worry if there's areas that are a bit stubborn, just make sure that you've covered the whole hide with as much emulsion to make it nice and damp and slightly "shiny" with oil.
Now, grab a towel, soak it in hot water, and try your best to wring out
excess so it doesn't drip. Lay it lengthwise onto the oiled hide so that
it covers half of the hide. Fold the other side over onto the towel, so
you kinda making a hide/towel/hide sandwich. That way the oiled flesh
side is in contact with the damp, hot towel.
 |
| Notice how shiny the flesh side looks after the oiling? |
 |
| Deer burrito! |
 | |||
| Rolled tighter! More hot water! |
While waiting for the hide to hydrate fully and soften up, get 4 long pieces of wood, and start making a frame.
 |
| Make sure the frame is bigger than the hide! |

 | |||||
| It's easier to poke holes in the edge of the hide for lacing if you wet it first. |
Poke a hole into the hide, say 1cm from the edge.


Tie off the end onto the frame and continue process of poking holes and lacing for about 4 or 5 loops, then tie it off to the frame. Repeat on all sides of the frames, so you centre the hide properly. You can always re-tighten and re-lace later, so don't go too nuts with it yet. You want to make sure you laced the hide as flat as possible, stretching out all creases.
 |
| 5 anchor points to centre properly. |

Here's some update on the hide. I finished lacing it a couple of days ago:

You may notice that the some of the edges actually drapes over the frame; this is because I wanted to save some of the edge pieces as unsoftened bark tan (they're the really thick bits - neck, bit of the leg) for some over things. The main body piece will be softened.
Now make some more of the leather mayo, and dilute it with water. Grab a paintbrush or a sponge and start slapping it on. Again, don't be stingy. It should suck up the good stuff very quickly, now being stretched on the frame.


How much emulsion do you need to paint? Depends on how soft you want it to be, how much creases you need to work out, how quickly you work, etc. The second painting uses up about 400ml of emulsion, as I have a lot of creases to smoothen, from the rolling.
At this point, you can either let it dry as is, to get a stiff-ish flat rug, or work it with a tool to soften it a bit more. If you do decide to work it with a tool, make sure you sew up all the holes or you might end up tearing the holes into bigger holes ... well you get the idea.


To soften, I decided to to make and use a deer scapula (shoulder blade) that's been cleaned and degreased. I would have reshaped it a bit more and have a wooden handle for it, but for this hide, I'll just use it as is. Once degreased the bone should dry very well with little oily residue seepage, and hence less chance of rancid fat smells. You have to remember that bone marrow is a very fatty substance, not to mention extremely delicious! Don't waste it!
Here's what it looks like now that it's softened. It lies flat, and can be rolled and folded easily. Not exactly velvety, robe soft, but good enough for a bedroom rug


Deer hock pouch
Deer hock pouch, iteration 2; with belt loop
How to skin deer legs for hockskins
Bark tanning hair on deer hide
How to remove the pasterns and coffin bone from a deer foot
Salt Curing deer hides for storage
How to degrease deer bones for making tools
Soap/Oil tanning hoof-on, hair-on, Mule Deer hockskin
Alum tawing white tail hair on neck skin
Processing green deer hide into ....
Wild Foods compilation
At this point, you can either let it dry as is, to get a stiff-ish flat rug, or work it with a tool to soften it a bit more. If you do decide to work it with a tool, make sure you sew up all the holes or you might end up tearing the holes into bigger holes ... well you get the idea.


To soften, I decided to to make and use a deer scapula (shoulder blade) that's been cleaned and degreased. I would have reshaped it a bit more and have a wooden handle for it, but for this hide, I'll just use it as is. Once degreased the bone should dry very well with little oily residue seepage, and hence less chance of rancid fat smells. You have to remember that bone marrow is a very fatty substance, not to mention extremely delicious! Don't waste it!
 |
| Cleaned and degreased deer scapula. |


Other links that might interest you:
Deer hock pouch
Deer hock pouch, iteration 2; with belt loop
How to skin deer legs for hockskins
Bark tanning hair on deer hide
How to remove the pasterns and coffin bone from a deer foot
Salt Curing deer hides for storage
How to degrease deer bones for making tools
Soap/Oil tanning hoof-on, hair-on, Mule Deer hockskin
Alum tawing white tail hair on neck skin
Processing green deer hide into ....
Wild Foods compilation
I like that dark color.. what did you use to bark tan the skin with?
ReplyDeleteSpruce bark! Just whittled a whole bunch of them from the branch prunings in the spring. Thinking of getting some Hemlock bark next time I go westward into BC - they give a nice deep purplish-maroon tan.
ReplyDeletejoanne2crows, you name sounds very familiar - have we met on Paleoplanet? I also go by the moniker Foxfire
ReplyDeleteYes.. that is I! You can find me on 'the buck rub forum' I post a lot on that one.. I'm allowed there.. lol.
ReplyDeleteAh, OK. Will check out the buck rub. So many forums (and deer hides!), so little time!
ReplyDeleteIf I want to make a blanket, how would I continue to soften it? Would I need to repeat the complete process, with the warm damp towel and all? Or just continue to paint it with the leather mayo and work it in? I would like to add thank you so much for posting this! I was taught how to tan hides by my uncle at a young age, but he didn't get to teach me how to soften them unfortunately. We moved away.
ReplyDelete