Caffeine: the most potent artificial intelligence drink!

Caffeine: the most potent artificial intelligence drink!
Deep in the Lair of the Perpetually Curious Fox
Showing posts with label Deer hock skin. Show all posts

Monday, 20 February 2012

Deer hock pouch iteration 3

Deer bone button

Twisted tea tanned leather strap

Nearly done


Running seam for attaching strap to side of pouch
Bone button on leather cord, with glass beads

Tea tanned leather Button loop on the flap.

Very BLING name panel! Glass seed beads on tea tanned leather

Taaa daaa! Be the envy of your friends

OK I suck at beading. Hahaa

Wednesday, 18 January 2012

Mule Deer hock skin: part 2 - removing long and short pasterns

Removing the long and short pasterns, de-membraning, and soap tanning a muley deer hock skin.

Here's the long awaited sequel to the "How to skin deer legs for the hockskin" tutorial.

First a little refresher on the anatomy of a deer foot. And here it is again, a diagram of a horse's foot (which is homologous to that of a deer's). For this project, I decided to remove only the long and short pasterns, and leave the coffin bone in, as the hoof tends to dry flat if the coffin bone is removed. Due to the remaining coffin bone, care should be taken in making sure the hoof and the innards dry completely and quickly, or you risk bacterial colonies forming and you end up with a very stinky hockskin. 


Again, get yourself a fresh (or rehydrate a salt cured, or thaw a frozen) hockskin from your collection. In the previous "how to", I left the long pastern, et al, in the skin, as I was skinning 8. Those were tossed in the freezer, and thus I thawed it out in room temperature soapy water. Removing the long pastern is relatively easy, as the joint lies above the hoof/skin border.


Remove the long pastern.


At this point, my hands and fingers are not cooperating, in order not to slice myself to jerky bite size, I delayed removing the short pastern, and rolled up the hock (with the bones in the hoofs) in a towel to absorb the excess moisture and make the hair side dry a bit faster. Then tacked it on a board so it'll dry flat.


When the hockskin is nearly dry, scrape away the membrane and superfluous tissues with a knife. 


The bones in the hoof should be removed, too, so on the next day when fingers do obey my commands, I dig in... I found the best way (for me, that is) is to:

1) poke the blade between the skin and the tissues surrounding the bone loosening the cartilage capsule,
2) then get the blade to go between the flexor tendon and the short pastern bone (refer first diagram!) via the "heel" end of the hoof, to reach the joint that connects the short pastern to the coffin bone.
3) Blade should slide in easily, wiggle the point to severe the joint ligament.
4) Then use the knife to lever the disconnected joint out.

Like dental surgery. That way you don't have to deal with the navicular bone getting into the way. First try took me 45 minutes, after I figured out this trick it only took me 5 to 10 minutes. No boiling or pliers needed! And trust me, I've got pretty weak hands, so it's a neat trick.


Dig between flexor tendon and pastern bone ... side by side slice to severe the ligament, then twist the blade to lever out the bone.

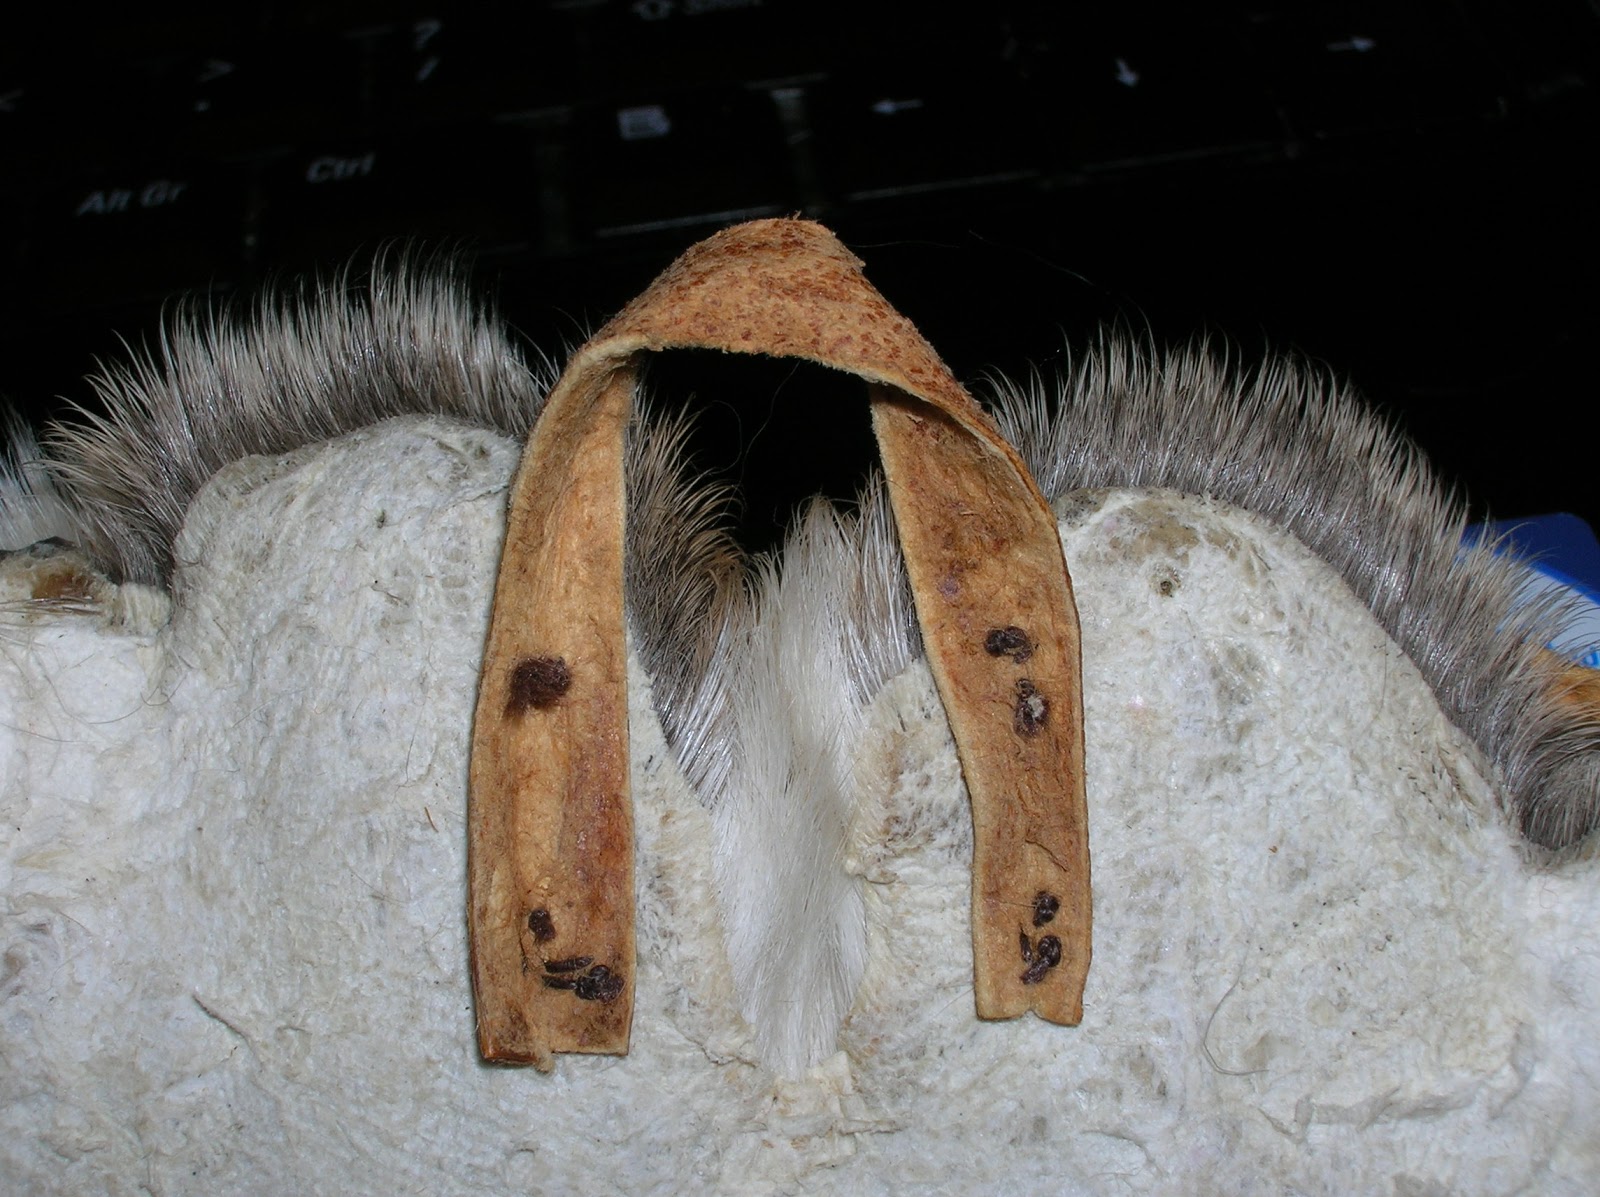
Out comes the short pastern!

5 minutes later, the second one is out, too.
As I left the coffin bone in (the hoof tend to get a squished look when dry, without the coffin bone) I stuffed the socket left by the excavation with a mixture of salt (to dehydrate the soggy tissue) and borax (also helps dehydration, and cuts down on possible smellies).

Salt n borax in the sockets.


Then, to stop the powders from spilling while you work on the rest of the hock skin, plug it further with a wad of tissue paper, or cotton, or any other porous, breathable fabric you have. The idea is to let moisture wick away from the soggy cartilage/bone into the salt/borax, and then evaporate through the tissue plug.

For some reason, this really reminds me of my last wisdom tooth removal surgery!
Then carry on with removing membrane ... if you're lucky you can work off an edge of the membrane from the skin, then use pliers (if you have weak hands like mine) to rip off sheets from the skin.


Then rub a wet sponge on the flesh side, I left a border of about 2 cm (~1 inch) from the plugged socket to the wetted area. Then rub in the dressing.


As always, use a hot damp towel to help with the re-hydrating the skin.


If the hock is too stiff to roll, put a heavy object on it first, until it's damp enough to roll. Then roll it into the towel/skin deer burrito. Hold it in place with rubber bands, but try not to let the tissue paper plugs come into contact with the damp towel! This way you can simultaneously dry the hoof, bones, cartilage end and dampen the rest of the skin.


Leave it overnight, or however long it takes to dampen into loose skin again, then re-dress.


Use whatever scraper you have lying around ... here I'm using a deer scapula. Also helps to scrape away any stubborn membrane remnants still clinging on the skin. Work the dressing in real good. The blunt end of a sharpie pen also works fine.


Keep going until it's starting to show some sign of getting dry ..


Add more dressing if necessary. Hock skins are thick, and with really tough fibres, so it takes a bit more oiling and working compared to the average body hide.


5 minutes break while I have a read on Paleoplanet


Aaaaand we're done! I like using this method as it keeps the hair stuck on pretty good. All it needs now is a bit of smoking, but I'll wait until I have several more skins to smoke with it.


Other links that might interest you:


Deer hock pouch
Deer hock pouch, iteration 2; with belt loop
How to skin deer legs for hockskins
Bark tanning hair on deer hide
Softening bark tanned hair on deer hide
How to remove the pasterns and coffin bone from a deer foot
Salt Curing deer hides for storage
Alum tawing white tail hair on neck skin 
Processing green deer hide into .... 
Wild Edibles Compilation

Friday, 30 December 2011

Deer hock pouch, iteration 2

OK, finished the 2nd hock pouch. My fingers are a bit sore, so I think that's enough leather sewing for today LOL.

The modification for this one includes a belt loop.

Please excuse my rather sloppy sewing skills and the not very paleo multitool pliers! I don't want to imagine how hard it would be to sew a bark tanned hock! Stabbied myself several times with the needle.

Image

Image

Image

Yes, I used a dark coloured milsurp kit thread, as I can't see them stitches too well if it's light coloured. Waxing the thread helps a bunch. Just used a normal sewing needle that can take that thread.

Then comes the thong bit with a knot, as a button. Thought about using some bone/antler next time.

Image

Image

Aaaaand after many needle stabbies and curses .... it's done! Deer hock pouch, iteration 2.

Image

Low tech solution to high tech problem LOL

Image

This time I didn't soften the hock on the back of the chair like I did the first one.... but got curious with ehailstone's (on Paleoplanet Forum) mention of "oo-luke" technique of softeningand decided to try it in combination of using a spoon as a mini-staking tool. Sorry about the weird angle - the only way I can take a photo is to bite one end of the hock skin to free up that hand for the camera.

Image

Quillsnkiko in Paleoplanet pointed out a cool tip - chewing the hard bits, and yes I did chew on the harder bits to moisten/soften it enough to make sewing possible :) tastes like smokey deer flavoured not-quite-chewing-gum-but-close LOL. Gotta make sure no doggies get this thing. Damn delicious.


Other links that might interest you:

Deer hock pouch, iteration 2; with belt loop
How to skin deer legs for hockskins
Bark tanning hair on deer hide
Softening bark tanned hair on deer hide
How to remove the pasterns and coffin bone from a deer foot
Salt Curing deer hides for storage
How to degrease deer bones for making tools
Alum tawing white tail hair on neck skin
Soap/Oil tanning hoof-on, hair-on, Mule Deer hockskin
Processing green deer hide into ....
Wild Foods Compilation

Saturday, 24 December 2011

Deer hock bag

Quick christmas present for my hunting buddy.


First, we get some hock skins. I have a few kicking around salt cured, so into the bucket with mild detergent and warm water it goes. I think I washed it 3 times with soap to finally remove the rut smell, even used a soft brush on it. Then rinse.

image

The membrane in the flesh side is such a bugger to remove, wet scrape wise, so I decided to leave them on for the moment - just making sure all the gluey stuff, rutty smell and loose animal bits are removed.

image

Roll it up in a towel, and wring, to dry off excess water.

image

Put it hair side up, on a towel, near a fan to dry off the hairside completely.

image

Tack it onto a flat board, flesh side up, to dry.

image

Once dry, use a sharp knife and a pumice stone to remove all membrane. I love the pumice stone - it kinda works like an eraser for membrane when the hockskin is dry. Love the stuff. Rub rub rub away until you remove the dried, shiny membrane stuff.

image
image

When most of the membrane is gone (little tiny patch here or there doesn't hurt it much), spray some water on it until damp, and dress it with your dressing of choice. I used 1/3 liquid soap + 2/3 oils.

image

Then I rolled it up in a damp towel that's been microwaved for half a minute to warm it up. Roll it up tight and put somewhere warm for an hour.

image

More dressing. Rub it in well, the hock skin should be really nice and loose, and pretty soft now.

image

Then work it. Took me about an hour or so, hock skin is quite thick, but having hot hands and a warm room helps.

image

More bits of membrane comes off, which I knew they would.

image

Sand paper to smooth it. Look how it compares to the tacked but not de-membraned, oiled and worked. I find it helps having an unworked piece to compare to as a reference for "done-ness"

image

The smoking step is missing because my niece's dog was keeping me busy - but yes, it was briefly smoked. For a tiny piece like this, what I did was put the hock in a tin with holes poked in the top and bottom. Then light an incense stick or put a smoky piece of damp wood in the tin. Smoke for as you needed. The tin helps hold the smoke in, too - so after an hour of taking out the hock out, there's still lotsa smoke in the tin.

I just folded the hock so that the hocky bit is on the flap. Basic envelope shape, if you will, and whip stitch the sides. Initially, I used a goldfish bead for a button, but it kinda looked a bit ... strange, so instead I just tied a knot in a trimmed piece of skin and sewed it on the main body. There is a hole that I accidentally poked into the hock skin when I was skinning it off the leg - the bit between the main hoofs, so that became the button hole. 

image
image
image
Very, very not a work of art, but for a last minute present for another fellow hunter, I'm sure it'll see some use!


Other links that might interest you:

Deer hock pouch, iteration 2; with belt loop
How to skin deer legs for hockskins
Bark tanning hair on deer hide
Softening bark tanned hair on deer hide
How to remove the pasterns and coffin bone from a deer foot
Salt Curing deer hides for storage
How to degrease deer bones for making tools
Alum tawing white tail hair on neck skin
Soap/Oil tanning hoof-on, hair-on, Mule Deer hockskin
Processing green deer hide into .... 
Wild Foods compilation