Caffeine: the most potent artificial intelligence drink!

Caffeine: the most potent artificial intelligence drink!
Deep in the Lair of the Perpetually Curious Fox
Showing posts with label hair on hide. Show all posts

Saturday, 21 January 2012

Experimenting with Alum Tawing ... white tail deer hair on neck skin

Decided to give Alum Tawing a try to see how well the hair sets in. Alum (Potassium Aluminium Sulphate) is a naturally occuring salt, that has been used for food (and leather) processing, with good solubility in water and sweet-acidish taste. It also one of the more popular tanning chemical that is relatively harmless (to humans and the environment) compared to the more commercial chemical formulas on sale. Not to mention, cheap!

I loosely followed the instructions as outlined by this document by New Mexico State University on Tanning Deer Hides and small animal furs.

First, as always, get your skin/hide/fur. In this case I'm using a piece of white tail deer's neck skin, that's been preserved in the freezer without being salted first. I gotta mention that I am not too fussed if the hair comes out, as the deer was delayed in being skinned, so some degree of bacterial action on the hair follicles has happened prior to the freeze. So, without further ado, I popped it in a bucket of warm soapy water to thaw, and clean off blood, rutty smells, and excess fats. Don't soak it for too long, deer hair on skins are notorious for slipping if immersed in (especially alkaline, like soap, borax, etc) solutions. That's why "bucking" in Ca(OH)2 solution is so popular with tanners who wants the hair off without the epic scraping.


Once washed and rinsed, the skins were rolled up in a towel to dry off the excess moisture, and dry off the hair as much as possible. Once the hair side is dry (use a hair dryer if you've got one, or put it near a heater vent - don't cook the skin!) tack them onto a flat board.

There's two pieces here, one will be used for the Alum Tawing experiment, the other will be used for Tea Leaves tanning experiment (another post!).

Once nearly dry, you should be able to scrape the membrane off very easily. In my case, it's just a matter of working an "edge" of the membrane off the skin, then just pulling them off. The more stubborn bits are subjected to a sharp knife, pumice stone, or sandpaper.


See, it comes off in sheets!

Membrane bits. You can save it to make hide glue for other projects. I tend not to both for this amount, as I have a stash of dried sinewy bits for my glue source.

You know you've scraped the membrane off when the knife scrapes clean. What's left is the tight rawhidey skin.
You DON'T have to tack it to dry to scrape the membrane off. You can wet scrape it straight after washing. I just find it's more convenient to scrape it when it's dry, as well as practice run before I attempt dry scraping a whole framed deer hide for an upcoming braintanning experiment.

Once it's de-membraned, pop it in a plastic container filled with water with some alum and ordinary salt diluted in it. For a small project like this, I think 5 days is enough. If it were a whole deer hide, I'd probably leave it in the pickle solution for 7 - 10 days. Don't forget to check it daily and stir often (twice a day is plenty for a piece this small).


The reason why you should check it everyday, is so you can witness the process in which the hide turns literally white all the way through. Cut a snip through at the edge to check. Don't forget to stir! It should also NOT smell of anything!

Once the skin is struck all white throughout the whole thickness, take it out of the pickle, and rinse.

See, it's white all the way through. It also has plumped up significantly, due to the alum molecule forming crosslinkages throughout the collagen fibre network (which is the basis of tanning). However, this alum-collagen linkages are not waterproof, so if you wash it too much, the "alum tanning" is undone.
 White it's still wet from the wash, rub in the dressing.

 
While waiting for the oils emulsion to soak into the fibres, flip it over, and dry off the hair side thoroughly. The skin will hold plenty of moisture so you don't have to worry about it drying stiff before the hair is dry.
A plastic fork works good for fluffing it while it dries.
So far no hair slippage ....
When the hair side is dry, work it a bit to open up the fibres. Back of a chair, spoon, hand softening, whatever. This is where I notice that the project piece is shedding a whole bunch of hair. It didn't quite go bald, but the shedding is annoying. I guess I should NOT delay skinning a deer next time. The buck was hanging in the garage (it was a little bit around freezing temperature) for a couple of days before it was skinned. Bad mistake, if you want a hair on hide! (Kicks myself)

Then, hang it/pin it and let it dry a bit more, until the point where it's no longer "wet" to the touch, but still "cool" to the fingers (meaning it surface is dry, but the inner fibres still holding some moisture).
I clipped it with a folder clip, and  hung it in a warm area.


 You know when to start re-working it when you see patches of "opaque white" on the surface. 


Then give it all you got, work it with your hands, staker tool (spoon, blunt knife, deer bone), back of the chair, etc, until it is completely dry. When you think it's dry, work for another hour. And yes, it shed like crazy! Maybe for the rest of the hide (still in the freezer) I will have to remove the hair. I intend to leave to grain on, though.


So there, that's what the alum tanned hair on deer neck skin looks like. Would I do it again? Yes, but probably won't use it for making things that will see moisture. Maybe I would experiment with rubbing beeswax to make sure the surface, at least, repels water. For a beginner learning a hands on technique of tanning, I'd highly recommend it, especially if you're after a pure white leather look.

It does take a bit more work to soften, compared to the oil/soap tanned method.
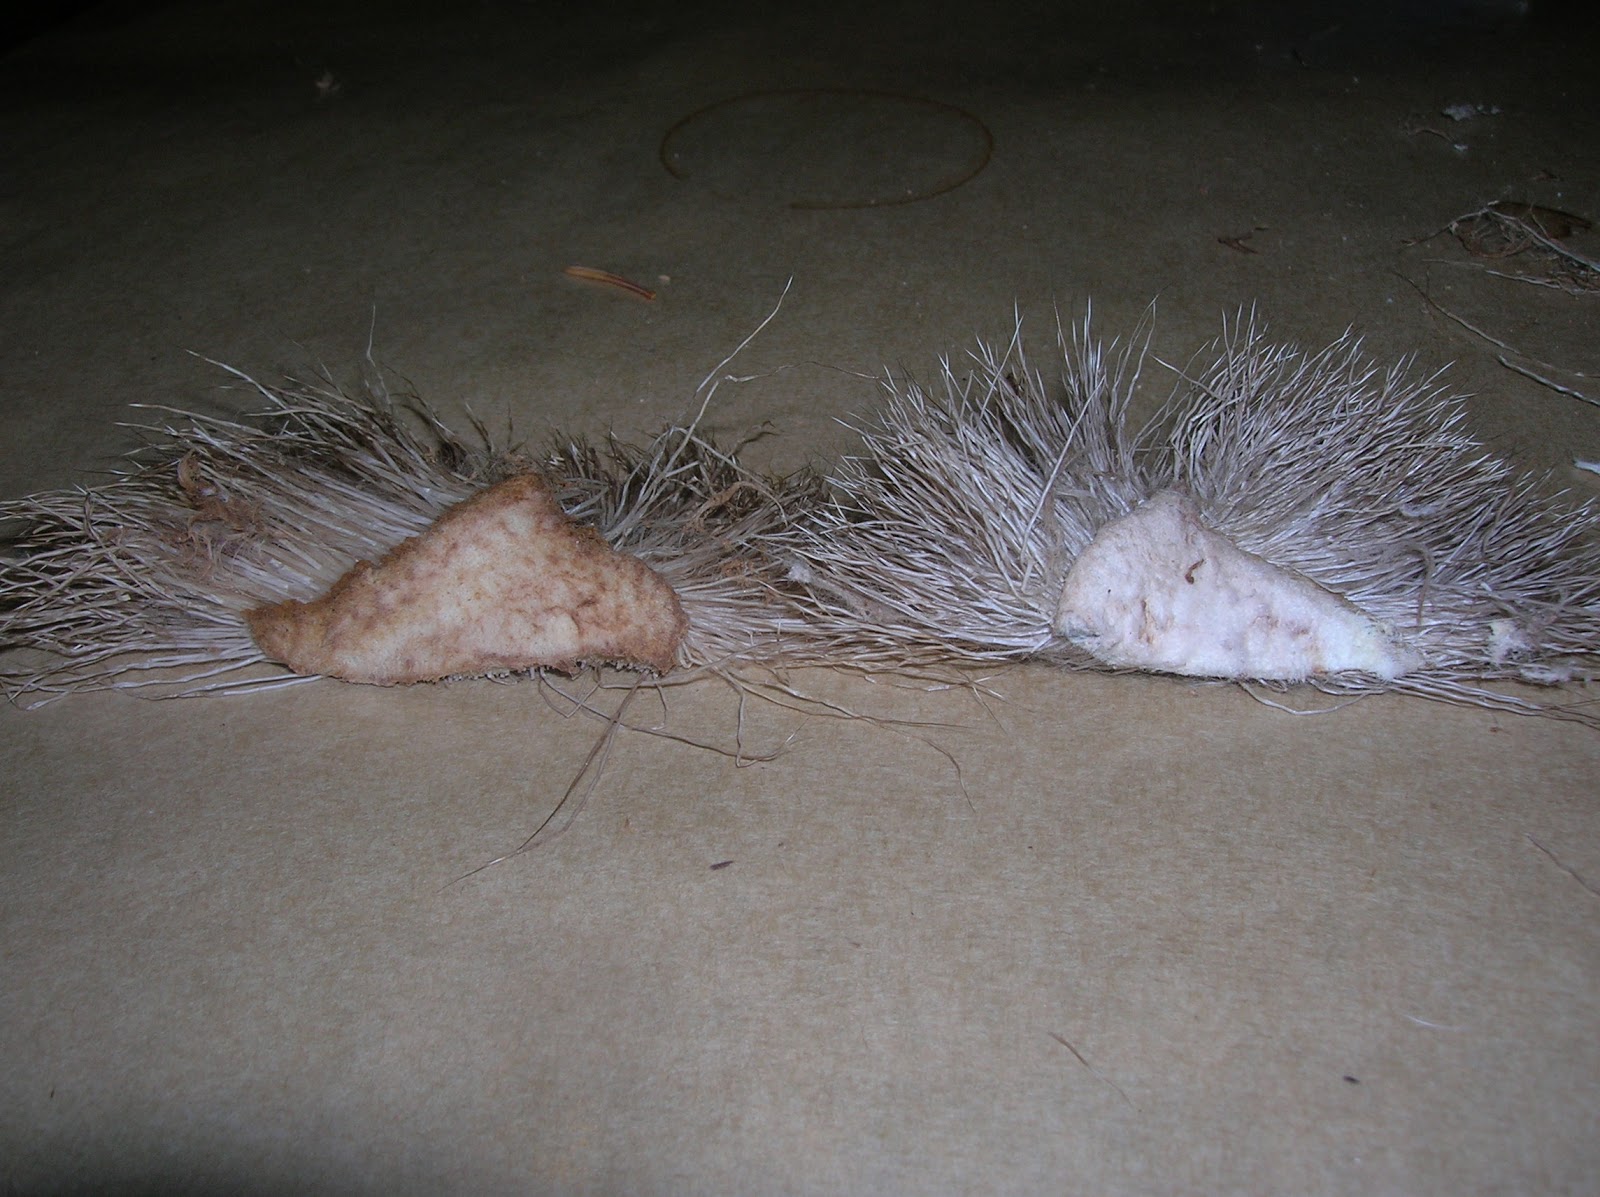
Here it is compared to the tea tanned neck skin (still not struck through, will post when it's done)

Saturday, 31 December 2011

Softening the bark tanned deer hide

Decided to finish the bark tanned hide project. Technically, I could have let it be as it is now, it's tanned and won't spoil, but I'd like it to be a bit softer and lies down flatter. I'm sure the cat would agree with me, too.

Goosey Lucy on the deer hide. The hollow deer hair is VERY warm, as this fat cat can testify.

First of all, we make the dressing solution, if you don't have raw deer brains handy you can substitute with a mixture of 1/3 soap and 2/3 oils.


1/3 liquid soap (hand soap works fine, as do shower cream) and 2/3 oil. Any oils, really, I'm using olive oil.

Shake it well until it emulsifies.

Should have the consistency of thick cream/runny mayonnaise. It doesn't hurt to be runnier, than thicker.

If you're working on an already really damp, small project piece like the deer hock skin, then just rub in the thick leather mayo in as is. I just find that diluting the "leather mayo" with equal amount of water and shaking it well makes it easier to paint on using a brush. Plus, the extra water helps the hide take in the oil in the mixture. 

Then, grab that bark tanned hide, and spray water on the tanned flesh side with an atomiser, or just use a damp sponge to dampen the surface. The "leather mayo" will absorb better when the hide is damp, plus, we're going to roll it up and it's never a good idea to roll dried hide as it'll crack and damage the grain layer and start shedding hair.

Tools of the trade: paintbrush, jar of diluted leather mayo, and an atomiser.
Once you've sprayed the flesh side and get it fairly damp, paint on the diluted leather mayo. Don't be stingy, you can always make more of the leather mayo. Paint away; the hide should suck up the emulsion pretty quick.


There will be areas that probably needs some "help" in getting the emulsion into the collagen fibres - you can either use a smooth rock to press it in, or using a blunt wooden implement .... you know, like a STICK lol.

Work the emulsion in well - it needs to reach the collagen fibres throughout the whole hide.

If you've worked it in well, the flesh side should take a darker colour. Don't worry if there's areas that are a bit stubborn, just make sure that you've covered the whole hide with as much emulsion to make it nice and damp and slightly "shiny" with oil. 

Now, grab a towel, soak it in hot water, and try your best to wring out excess so it doesn't drip. Lay it lengthwise onto the oiled hide so that it covers half of the hide. Fold the other side over onto the towel, so you kinda making a hide/towel/hide sandwich. That way the oiled flesh side is in contact with the damp, hot towel.
Notice how shiny the flesh side looks after the oiling?
Now roll it up! Don't worry if it doesn't roll up properly at first. Take your time - you can always re-roll it tighter when the hide has sucked up enough moisture and becoming less cardboard like and more thick blanket like.
Deer burrito!
Leave the deer burrito overnight with the towel rolled up inside. Check again and re-roll tighter and soak more water into the towel as necessary. The heat from the hot water helps the collagen fibres to relax and makes the oils penetrate deeper .... think of the "hot oil treatment" for dry hair. Don't use water that's too hot, obviously! You want to warm the leather, not cook it!

Rolled tighter! More hot water!


While waiting for the hide to hydrate fully and soften up, get 4 long pieces of wood, and start making a frame.
Make sure the frame is bigger than the hide!
Then place the hide centred on the frame lying on the floor. Since we're not really doing any scraping as such, like scraping off flesh or hair, it's not too compulsory to have the hide laced super tight. Just make sure it's tight enough laced so you can work out the creases. The hide should shrink a little as it dries, so keep that in mind, too.


It's easier to poke holes in the edge of the hide for lacing if you wet it first.


Poke a hole into the hide, say 1cm from the edge. 

Use a bent paperclip with a loop at the end and poke through the hole into the hair side. Catch the string in that loop and pull it back to thread the string into the whole.


Tie off the end onto the frame and continue process of poking holes and lacing for about 4 or 5 loops, then tie it off to the frame. Repeat on all sides of the frames, so you centre the hide properly. You can always re-tighten and re-lace later, so don't go too nuts with it yet. You want to make sure you laced the hide as flat as possible, stretching out all creases.

5 anchor points to centre properly.
OK, here's the hide on the frame with the frame propped up. I'm going to stop now as my fingers are getting tired! Will continue .....

Here's some update on the hide. I finished lacing it a couple of days ago:

You may notice that the some of the edges actually drapes over the frame; this is because I wanted to save some of the edge pieces as unsoftened bark tan (they're the really thick bits - neck, bit of the leg) for some over things. The main body piece will be softened.
Now make some more of the leather mayo, and dilute it with water. Grab a paintbrush or a sponge and start slapping it on. Again, don't be stingy. It should suck up the good stuff very quickly, now being stretched on the frame.


How much emulsion do you need to paint? Depends on how soft you want it to be, how much creases you need to work out, how quickly you work, etc. The second painting uses up about 400ml of emulsion, as I have a lot of creases to smoothen, from the rolling.

At this point, you can either let it dry as is, to get a stiff-ish flat rug, or work it with a tool to soften it a bit more. If you do decide to work it with a tool, make sure you sew up all the holes or you might end up tearing the holes into bigger holes ... well you get the idea.


To soften, I decided to to make and use a deer scapula (shoulder blade) that's been cleaned and degreased. I would have reshaped it a bit more and have a wooden handle for it, but for this hide, I'll just use it as is. Once degreased the bone should dry very well with little oily residue seepage, and hence less chance of rancid fat smells. You have to remember that bone marrow is a very fatty substance, not to mention extremely delicious! Don't waste it!

Cleaned and degreased deer scapula.
Here's what it looks like now that it's softened. It lies flat, and can be rolled and folded easily. Not exactly velvety, robe soft, but good enough for a bedroom rug


Other links that might interest you:


Deer hock pouch
Deer hock pouch, iteration 2; with belt loop
How to skin deer legs for hockskins
Bark tanning hair on deer hide
How to remove the pasterns and coffin bone from a deer foot
Salt Curing deer hides for storage
How to degrease deer bones for making tools
Soap/Oil tanning hoof-on, hair-on, Mule Deer hockskin
Alum tawing white tail hair on neck skin 
Processing green deer hide into .... 
Wild Foods compilation

Saturday, 29 October 2011

Bark tanning hair on deer hide

So, I noticed there's a salt cured deer hide sitting in the garage loft that's been languishing there for 12 years. I thought, hey, why not try tanning it with whatever I can find on hand? Not being a chemist or a farmer, I do not have any alum (hydrated potassium aluminium sulphate), nor do I have any spare brain to attempt a brain tan, thus bark tanning became the method of choice. 

Where does one find bark? Everywhere! Some bark are better than others due to their high tannin content, but really, you can use any type of bark that leaches tannin into water. You might need a heck of a lot if the bark is poorly tanninated (hahahaa made up word!) or relatively little amount of bark for tannin rich ones. Traditiontally people use Oak or Hemlock bark, and if you google the various taxidermy and paleotech forums, those usually are the bark of choice, but I kinda like doing things in a new way ... so a literature search (thank you google scholar!) on what North American trees have high tannin yield, and are available locally was done. Found many sites, but I will only quote these two just to stop sounding too bloody academic. Here's one that lists different regionally available North American trees with their relative tannin contents in various tissues :
1- Hernes 2004 GCA Tannin signatures.pdf (application/pdf Object) and if you look at the table of sum of tannin in tissue content lists oak, hemlock and lodge pole pine as the highest. Since Pines and Spruce are closely related, on a hunch a searched for tannin content of spruce bark.

Indeed, spruce has lots of tannin in it, but traditionally they were ignored as the bark is pretty thin; it's not viable, amount of work to product-wise, usually, to chop down a spruce for the tannin. Here is the paper on the content of tanning in a particular species of spruce: (paper on Tannin content of Sitka Spruce). BUT if you already have lots of spruce bark available (mulch from garden centres, spring prunings) then there's no reason not to use it!

OK, ingredients are readily available, and I've got time to kill. Lets tan that hide! 


First of all, if you have a freshly skinned hide, you'll need to remove as much of the flesh, fats, connective tissue and membrane from the flesh side as possible. Since I started with a salt cured hide, I hydrated it first in a weak borax bath. When I say weak, I meant 1 cup of powdered borax crystals in about 20 litres of water.

A lot of tanners start by soaking in hydrated lime, ash powder, soda ash and other strong alkali to help ease the fleshing. However, if you're planning a hair on hide, do note that strong alkali is also a strong depilatory agent, thus not really a good idea. That was why I chose borax, which is weakly alkaline. Why the alkaline start? Well, if you remember your basic high school chemistry, base reacts with fats to form ... soap! Saponification of the deer fats in the skin and the tissues by the borate ions does help the fleshing immensely but without the epic hair slippage of strong alkali.

If you want hair off, then go ahead, raise the pH (as I said, soda ash, wood ash, hydrated lime, heck even use NaOH). The skin tissue will also change into a really strange gelatinous, translucent, really soggy, slippery wet mass, though! There's also some mention of the strong base can weaken the collagen in the hide ... but I don't know. Maybe I'll do a quantitative strength test on the next hide which I'll do hair off.

Deer hide in borax bath for 2 days.
I do find that salt curing the hide also helps shrink the membrane from the hide, so not only does it preserve the skins, it also helps when you flesh it, later on when you are not too busy butchering deer. Next comes the fleshing, and since I am just doing things with readily available items at home all I used was a sharp knife (and lots of sharpening!). I can see why some people resort to fleshing using a power washer. I kid you not, it's a LOT of scraping! Since I have moderate RSI I have to stop and rest my hands every hour or so... it took about 15 hours in total of scraping with a knife.


You can see the membrane and some bits of fat still attached, compared to the scraped bit on the bottom right of the photo


Bits of saponified fats, tissue, membrane.
After 15 hours of scraping, stretched leisurely over 3 days, hide is about 99% un-needed bits free. Then it goes through a good rinse, until the water runs clear. For the next step to work, the alkali must be gone. If you're the alkali crazy person who loves to soak hides in strong bases, neutralisation is essential!Some even go ahead as acidifying the hide before the next step.


Nice good wash

I let the hide drip dry (not completely dry, but to the point it's slightly damp) with the flesh side out, so I can inspect for any spots that I missed. So far so good. The scraped hide looks bluish white (which of course doesn't really show on camera)


Clean skin! Notice a few overly deep scrape marks? Well, for a first try on wetscraping I give myself A-
Oooh yeah! Here comes the bark tea! I used garden bark mulch that you can get from garden centres, and with whittled bits of spruce bark from my other projects to make this tea. And yes, it does kind of smell like tea ... sprucey tea. How much did I use? About a kg of bark in 2 litres of water, boiled for 2 hours. Then I pour it into the tub with another about 18 litres of water - just enough to submerge the hide in.

I started with a weak tea first so I don't shock the hide too quickly and avoid case hardening.


After 3 days, I lifted the hide out to re-scrape some stubborn areas and to check for rot. The hide has taken the tannin a bit, it looks a light cream colour instead of bluish white now. Now, with regards to rot, some people put lots of salt (you know, NaCl) into the bark bath, or acidify it with citric or oxalic acid, to discourage bacteria growth. I didn't do either of those, as I'm counting on the bark itself containing lots of sugars and phenolic compounds that would naturally ferment and turn acidid. I did have a quick taste of the bark tea, and yes it is somewhat sour with a puckerish taste (like very strong overly brewed black tea). I deemed it sufficient to inhibit any putrefying bacteria.


3 days in bark tea


The tea also helps you notice more stubborn spots that needs scraping.

Nice colour, right?
Some people might comment that my tea is not strong enough, etc due to the light colour. I have to point out that it's pretty cold here (about 5 to 7 deg C during the day, below freezing at night) and like any good chemical process and reactions, it slows down tremendously when them molecules don't have enough kinetic energy (see, who says a physics degree isn't useful?)

The whole project is surprisingly un-smelly, which contradicts the old adage of tanneries stinks to the high heavens. Mind you I did not bate the hide - google "leather bating" it will give you a hint on why tanneries tend to smell so bad. I made sure to stir the bath, lift the hide and agitate it every which way to make sure the tannin soak is even. All I can smell is ... tea! Even wasps ignored the hide which is a good indication that no flesh smell, or rot has happen. If you start smelling sulphurous smells... then you've got bacteria problem. Make sure the hide is FULLY immersed and there's no trapped air bubbles in the folds.

day 10 in bark tea. Even darker colour now.

Close up
Oh yes, and more scraping too. Personally I don't mind all the scraping. It gives me an excuse to closely inspect every inch (2.5 ish cm LOL) of the hide for any sign of things going wrong.

Bark sticks on everything

Gave the flesh side a quick rinse with the hose before the scrape


Drip dry for a bit

Cut through the neck piece to check if the tannin is soaking through OK. Middle is still a bit white.

Knife, brush (for the hair side), whet stone, and pumice (which I ended up NOT using)

Yes, the hair side is fine ....

Decided to give the hair side a quick brush and clean with some soapy water. Some fatty tissue and membrane got stuck on the hair!

Shampoing a deer is kinda strange ...

Nice clean rinse.
Now to make a stronger batch of tea - I decided to pour out the old tea as there's bits of stuff floating in it, and I just don't want them to re-stick on the hair side again. Spruce bark steeped in hot water over night ... yum ...

Hide is being submerged by the bricks.

Day 17 in the bark tea ... nice chocolate colour now! Nearly done, I would say!

Starting to look like tanned leather.

Hair side still looks good

Even smells sprucey!
After 17 days in the bark tea, the texture of the flesh side changed from wet, soppy, slippery texture to feeling "dry" to the touch. Sounds paradoxical, but if you ask my nerve endings, they say it feels "dry" despite being dripping wet! Such is the astringent nature of tannin!

Bark tea before strengthening.
bark tea after strengthening.
Well, that's as far as I've got so far. I waited this long before putting this article up as I wasn't sure if things are going OK at first. A lot of people say "oh, you should put acid in it!, "oh, you need to check the pH with a meter", "oh, you didn't soak it in lime before tannin, it'll never work" ... so I figure I'd see if my method works before I put this online

Day 25!

Wow, time really flies when you're busy doing projects! Decided to bring the whole operation indoors before it all becomes a deer and spruce flavoured ice cube!

You can see the ice crystals on the hide ...

Looks, feel, and smells like leather now.
I cut a snip from the thickest part of the hide to see if the tannin has reached the centre of the skin - to have a more objective and qualitative comparison, I put it side by side with a snip that I took on day 10.

Day 25 on the left, day 10 on the right. Even the hair has started to take up a bit of tannin colour.

You can see that the middle of the 25th day snip is cream colour instead of white, like the 10th day snip.

Visible even with a dodgy camera focus.
I'm leaving the hide in the bark tea for another two weeks before dressing with oil and working it. Check this space!

OK, today is the 1st of December, about 6 weeks after the initial bark tea soak.

Sorry for the long wait ladies and gents, but I've had the sneezies for a week, then was out of town for 5 days for the last few days of huntin'. Hide has struck through! Yay!

Since the project has been moved to the basement it's a bit harder to hose the hide for rinsing ... so I took a bold (and most probably stupid) move of using the top loader washing machine LOL. 

2 delicates cycles on tepid water with a little bit of mild soap, and final rinse (also tepid delicates cycle). I was expecting clumps of hair to peel off ... but you know, the tannin really worked well in setting the hair into the follicles! Only a small handful came off, and most of them from the areas of the hide that I accidentally over-scraped (exposing the roots. I'm still learning :) ) anyways. I'm not too worried as these are the areas I'm going to trim off after working. I just like the extra hand grips for softening the edges.

So wash with soap cycle 1


Cycle 2 looks pretty much the same. Then rinse

Yes, I did let the hide go through the spin cycle (GASP!) as the whole barrel rotates anyway and no mechanical rubbing to muss up the hair. Due to my hand injuries, I can't lift the hide out of the tub unless most of the water is spinned out.

Now back into the tub to transfer to another warmer room


Bald spot on the overscraped belly skin. Need to be more gentle with bellies next time, notes to self. But hey, the belly skin will make a nice coin pouch :) 


The flesh side looks nice, lighter colour now. Golden brown, texture like sun ...


Hair side looks really nice. Tinged with gold from the bark tea. Even tugged it a few times while lifting, and no clumps came off. Maybe one or two incidental hair, but nothing to fret about :)


I'm letting it air dry with the hair side out until I can get my act to together for a long, comforting, sit down oil and stretch in a few days :) If it dries out completely I'll re-wet it by rolling/folding in a damp towel.

I did take off a hand sized snip from the neck to experiment with a dressing mix ... and I must say I like the result (the bark tanning hand snip is lying on top of another mule deer hair on scrap hide tanned using alcohol/turpentine soak):


The hair side definitely has a golden tinge to it. Lovely!


Am really excited on working it! Can hardly wait! I also like the fact that it smells sprucey

Here's some more pictures of what it looks like as it's drying:

Draped over the backs of two chairs, with the hair side out, to dry.

Almost completely dry; folded lengthwise to show the flesh side

 Close up of the bark tanned flesh side.