Caffeine: the most potent artificial intelligence drink!

Caffeine: the most potent artificial intelligence drink!
Deep in the Lair of the Perpetually Curious Fox

Saturday 28 January 2012

Processing a White Tail buck hide into .... [still undecided!]

Got a bit tweaky (bored and restless) so I decided to thaw out the white tail buck hide that's been sitting in the freezer for a couple of months. This time I'm attempting to process and tan it without salt curing the hide, just to properly document it.


Fleshing the Hide

There's a reason why leather work and butcheries in various cultures are usually relegated to the lowest castes; it can be a very gory process complete with excessive slathering of blood, tissue fluids, bodily goo, and if you're unlucky enough to work with a less than fresh hide, the perfume of putrefying flesh.

Be thankful for small mercies, that's my advice. A freshly thawed hide (provided you freeze it as soon as you skinned it off the animal) does not smell nasty. It does still, however, have a lot of fresh tissue goo, blood, etc. which is one of the reasons I prefer to salt cure a hide and let nature do it's work for me in breaking down the icky stuff.

Ideally, one should use a flesher beam and a proper fleshing tool. I am a great believer in the K.I.S.S principle (Keep It Simple, Stupid!) so all I used for fleshing this critter was my good ole knife (the edge dulled with use)  and a 2x2 piece of cedar. Works fine once you know the technique.

Just use the dull-ish edge to get a working edge of the membrane and "push" it off the skin. How dull should the knife be? Dull enough that you don't cut your own skin if you run the edge on your hand. This is so you can apply a lot of pressure on the hide to move the goo but not cut the skin.


Short break is needed!

There, all clean. All it takes is a dull knife, a piece of wood with rounded edges and a lot of goo scraping for 90 minutes
WASHING and DRYING

Then the fleshed and de-membraned hide is washed to get rid of most of the blood and surface goo, and clean the fur of "pollution". Don't worry too much about getting the rest of the goo out. It'll come out easier when you soak it later for dehairing. Once "kinda" clean, dry it out as soon as you can before anything has a chance to rot and stink.


In the meantime, I trimmed a piece of belly skin with the hair on to see what's the best way to "slip off" the hairs without using special chemicals.


So into the bucket of room temperature water, with a bit of borax added in (just to cut the oils)


In the mean time, the rest of the hide is loosely framed so that the edges dry properly without curling up.

Bamboo needle makes things so much easier.

Laced up in a warm, dry, lotsa air circulation place.
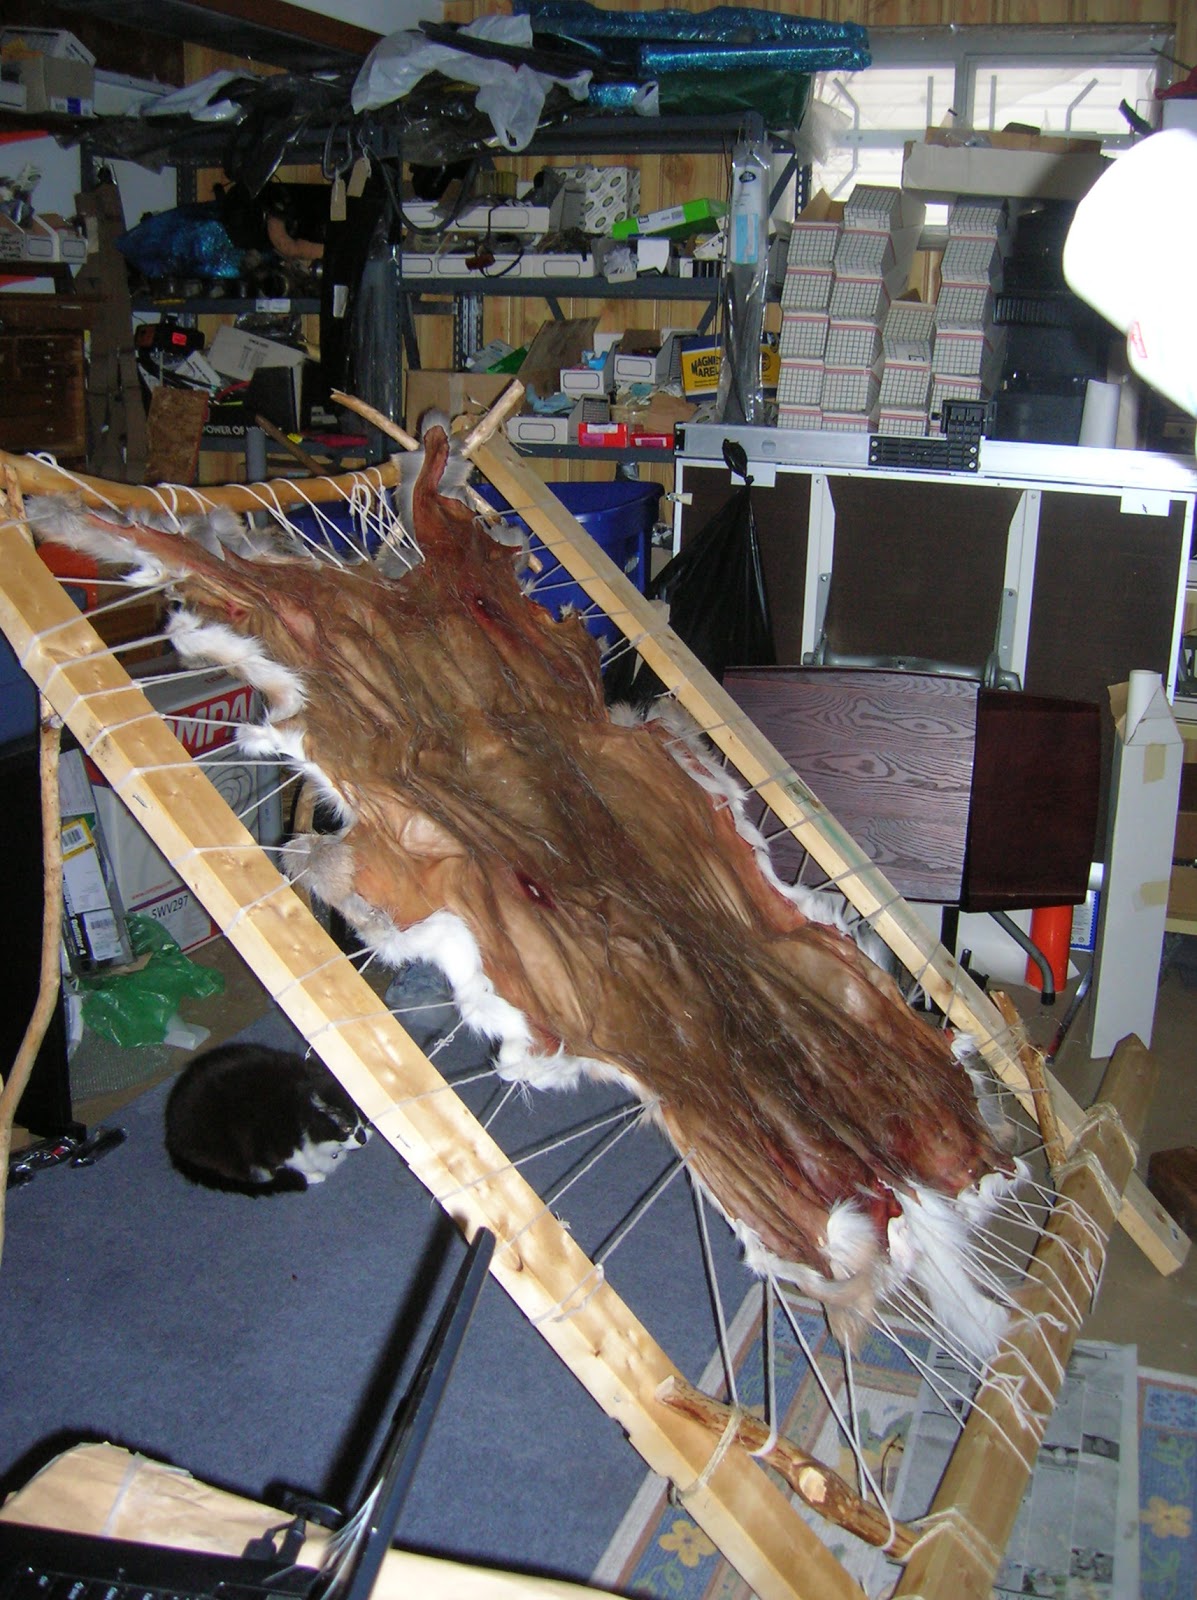
Cat likes to sit under the frame and pretend it's a Lean to
SOAKING AND DEHAIRING/GRAINING


Back to the belly skin in the bucket, 3 days later.....


The hair has started to slip! Using the same method as "fleshing", you can easily scrape off the hair AND the grain layer in this particular piece. If you're planning to bark tan the skin, leave the grain on. Of course, you can bark tan a grain off skin, but it'll be less water resistant. The grain helps the leather to repel water naturally.

For making buck skin, the grain is taken off. Once soaked for 3 days, the grain and hair just slides off with a blunt edge. No nassssty chemicals like Ca(OH)2 is needed, really, but if you like to have things easy, sure, lime it. Just make sure you rinse and neutralised all the lime outta the hide afterwards.


Re-scrape the flesh side while you're at it. Lotsa Hide Snot oozes out of the fibres in the soaking.
Once scraped mostly off the grain and hair, and removing superfluous Hide Snot, wash and rinse to get a wet sheet of unprocessed deer skin. Just for the hell of it, I just plopped this wet skin into a tub full of tea (yes, as in tea leaves).

Look! Alien Goo!

Tannin turns Alien Goo into partially tanned leather.
In the meantime, the rest of the hide on the frame has dried, so it was unlaced and stored for the moment while I debate with myself on whether to bark tan or brain tan the rest of it!


Gigantic Deer Jerky!
TO BE CONTINUED .....


Deer hock pouch
Deer hock pouch, iteration 2; with belt loop
How to skin deer legs for hockskins
Bark tanning hair on deer hide
How to remove the pasterns and coffin bone from a deer foot
Salt Curing deer hides for storage
How to degrease deer bones for making tools
Soap/Oil tanning hoof-on, hair-on, Mule Deer hockskin

Saturday 21 January 2012

Experimenting with Alum Tawing ... white tail deer hair on neck skin

Decided to give Alum Tawing a try to see how well the hair sets in. Alum (Potassium Aluminium Sulphate) is a naturally occuring salt, that has been used for food (and leather) processing, with good solubility in water and sweet-acidish taste. It also one of the more popular tanning chemical that is relatively harmless (to humans and the environment) compared to the more commercial chemical formulas on sale. Not to mention, cheap!

I loosely followed the instructions as outlined by this document by New Mexico State University on Tanning Deer Hides and small animal furs.

First, as always, get your skin/hide/fur. In this case I'm using a piece of white tail deer's neck skin, that's been preserved in the freezer without being salted first. I gotta mention that I am not too fussed if the hair comes out, as the deer was delayed in being skinned, so some degree of bacterial action on the hair follicles has happened prior to the freeze. So, without further ado, I popped it in a bucket of warm soapy water to thaw, and clean off blood, rutty smells, and excess fats. Don't soak it for too long, deer hair on skins are notorious for slipping if immersed in (especially alkaline, like soap, borax, etc) solutions. That's why "bucking" in Ca(OH)2 solution is so popular with tanners who wants the hair off without the epic scraping.


Once washed and rinsed, the skins were rolled up in a towel to dry off the excess moisture, and dry off the hair as much as possible. Once the hair side is dry (use a hair dryer if you've got one, or put it near a heater vent - don't cook the skin!) tack them onto a flat board.

There's two pieces here, one will be used for the Alum Tawing experiment, the other will be used for Tea Leaves tanning experiment (another post!).

Once nearly dry, you should be able to scrape the membrane off very easily. In my case, it's just a matter of working an "edge" of the membrane off the skin, then just pulling them off. The more stubborn bits are subjected to a sharp knife, pumice stone, or sandpaper.


See, it comes off in sheets!

Membrane bits. You can save it to make hide glue for other projects. I tend not to both for this amount, as I have a stash of dried sinewy bits for my glue source.

You know you've scraped the membrane off when the knife scrapes clean. What's left is the tight rawhidey skin.
You DON'T have to tack it to dry to scrape the membrane off. You can wet scrape it straight after washing. I just find it's more convenient to scrape it when it's dry, as well as practice run before I attempt dry scraping a whole framed deer hide for an upcoming braintanning experiment.

Once it's de-membraned, pop it in a plastic container filled with water with some alum and ordinary salt diluted in it. For a small project like this, I think 5 days is enough. If it were a whole deer hide, I'd probably leave it in the pickle solution for 7 - 10 days. Don't forget to check it daily and stir often (twice a day is plenty for a piece this small).


The reason why you should check it everyday, is so you can witness the process in which the hide turns literally white all the way through. Cut a snip through at the edge to check. Don't forget to stir! It should also NOT smell of anything!

Once the skin is struck all white throughout the whole thickness, take it out of the pickle, and rinse.

See, it's white all the way through. It also has plumped up significantly, due to the alum molecule forming crosslinkages throughout the collagen fibre network (which is the basis of tanning). However, this alum-collagen linkages are not waterproof, so if you wash it too much, the "alum tanning" is undone.
 White it's still wet from the wash, rub in the dressing.

 
While waiting for the oils emulsion to soak into the fibres, flip it over, and dry off the hair side thoroughly. The skin will hold plenty of moisture so you don't have to worry about it drying stiff before the hair is dry.
A plastic fork works good for fluffing it while it dries.
So far no hair slippage ....
When the hair side is dry, work it a bit to open up the fibres. Back of a chair, spoon, hand softening, whatever. This is where I notice that the project piece is shedding a whole bunch of hair. It didn't quite go bald, but the shedding is annoying. I guess I should NOT delay skinning a deer next time. The buck was hanging in the garage (it was a little bit around freezing temperature) for a couple of days before it was skinned. Bad mistake, if you want a hair on hide! (Kicks myself)

Then, hang it/pin it and let it dry a bit more, until the point where it's no longer "wet" to the touch, but still "cool" to the fingers (meaning it surface is dry, but the inner fibres still holding some moisture).
I clipped it with a folder clip, and  hung it in a warm area.


 You know when to start re-working it when you see patches of "opaque white" on the surface. 


Then give it all you got, work it with your hands, staker tool (spoon, blunt knife, deer bone), back of the chair, etc, until it is completely dry. When you think it's dry, work for another hour. And yes, it shed like crazy! Maybe for the rest of the hide (still in the freezer) I will have to remove the hair. I intend to leave to grain on, though.


So there, that's what the alum tanned hair on deer neck skin looks like. Would I do it again? Yes, but probably won't use it for making things that will see moisture. Maybe I would experiment with rubbing beeswax to make sure the surface, at least, repels water. For a beginner learning a hands on technique of tanning, I'd highly recommend it, especially if you're after a pure white leather look.

It does take a bit more work to soften, compared to the oil/soap tanned method.
Here it is compared to the tea tanned neck skin (still not struck through, will post when it's done)

Wednesday 18 January 2012

Mule Deer hock skin: part 2 - removing long and short pasterns

Removing the long and short pasterns, de-membraning, and soap tanning a muley deer hock skin.

Here's the long awaited sequel to the "How to skin deer legs for the hockskin" tutorial.

First a little refresher on the anatomy of a deer foot. And here it is again, a diagram of a horse's foot (which is homologous to that of a deer's). For this project, I decided to remove only the long and short pasterns, and leave the coffin bone in, as the hoof tends to dry flat if the coffin bone is removed. Due to the remaining coffin bone, care should be taken in making sure the hoof and the innards dry completely and quickly, or you risk bacterial colonies forming and you end up with a very stinky hockskin. 


Again, get yourself a fresh (or rehydrate a salt cured, or thaw a frozen) hockskin from your collection. In the previous "how to", I left the long pastern, et al, in the skin, as I was skinning 8. Those were tossed in the freezer, and thus I thawed it out in room temperature soapy water. Removing the long pastern is relatively easy, as the joint lies above the hoof/skin border.


Remove the long pastern.


At this point, my hands and fingers are not cooperating, in order not to slice myself to jerky bite size, I delayed removing the short pastern, and rolled up the hock (with the bones in the hoofs) in a towel to absorb the excess moisture and make the hair side dry a bit faster. Then tacked it on a board so it'll dry flat.


When the hockskin is nearly dry, scrape away the membrane and superfluous tissues with a knife. 


The bones in the hoof should be removed, too, so on the next day when fingers do obey my commands, I dig in... I found the best way (for me, that is) is to:

1) poke the blade between the skin and the tissues surrounding the bone loosening the cartilage capsule,
2) then get the blade to go between the flexor tendon and the short pastern bone (refer first diagram!) via the "heel" end of the hoof, to reach the joint that connects the short pastern to the coffin bone.
3) Blade should slide in easily, wiggle the point to severe the joint ligament.
4) Then use the knife to lever the disconnected joint out.

Like dental surgery. That way you don't have to deal with the navicular bone getting into the way. First try took me 45 minutes, after I figured out this trick it only took me 5 to 10 minutes. No boiling or pliers needed! And trust me, I've got pretty weak hands, so it's a neat trick.


Dig between flexor tendon and pastern bone ... side by side slice to severe the ligament, then twist the blade to lever out the bone.

Out comes the short pastern!

5 minutes later, the second one is out, too.
As I left the coffin bone in (the hoof tend to get a squished look when dry, without the coffin bone) I stuffed the socket left by the excavation with a mixture of salt (to dehydrate the soggy tissue) and borax (also helps dehydration, and cuts down on possible smellies).

Salt n borax in the sockets.


Then, to stop the powders from spilling while you work on the rest of the hock skin, plug it further with a wad of tissue paper, or cotton, or any other porous, breathable fabric you have. The idea is to let moisture wick away from the soggy cartilage/bone into the salt/borax, and then evaporate through the tissue plug.

For some reason, this really reminds me of my last wisdom tooth removal surgery!
Then carry on with removing membrane ... if you're lucky you can work off an edge of the membrane from the skin, then use pliers (if you have weak hands like mine) to rip off sheets from the skin.


Then rub a wet sponge on the flesh side, I left a border of about 2 cm (~1 inch) from the plugged socket to the wetted area. Then rub in the dressing.


As always, use a hot damp towel to help with the re-hydrating the skin.


If the hock is too stiff to roll, put a heavy object on it first, until it's damp enough to roll. Then roll it into the towel/skin deer burrito. Hold it in place with rubber bands, but try not to let the tissue paper plugs come into contact with the damp towel! This way you can simultaneously dry the hoof, bones, cartilage end and dampen the rest of the skin.


Leave it overnight, or however long it takes to dampen into loose skin again, then re-dress.


Use whatever scraper you have lying around ... here I'm using a deer scapula. Also helps to scrape away any stubborn membrane remnants still clinging on the skin. Work the dressing in real good. The blunt end of a sharpie pen also works fine.


Keep going until it's starting to show some sign of getting dry ..


Add more dressing if necessary. Hock skins are thick, and with really tough fibres, so it takes a bit more oiling and working compared to the average body hide.


5 minutes break while I have a read on Paleoplanet


Aaaaand we're done! I like using this method as it keeps the hair stuck on pretty good. All it needs now is a bit of smoking, but I'll wait until I have several more skins to smoke with it.


Other links that might interest you:


Deer hock pouch
Deer hock pouch, iteration 2; with belt loop
How to skin deer legs for hockskins
Bark tanning hair on deer hide
Softening bark tanned hair on deer hide
How to remove the pasterns and coffin bone from a deer foot
Salt Curing deer hides for storage
Alum tawing white tail hair on neck skin 
Processing green deer hide into .... 
Wild Edibles Compilation