**I have noticed that a few of my materials on this blog has been pasted on other pages. I have absolutely no problem with sharing knowledge and information, but please, please give credit where credit's due. To pass on my stuff as yours is just bad manners **
As promised in the previous post, here's a tutorial on how to skin deer legs to get their wonderful hockskins, with the hoofs attached. "Why bother", I hear you ask, so I answer "Why not?" plus I think once tanned and softened, they make good cases for small electronic gadgets!
Tutorial on skinning deer hock with hoof attached
Well, obviously get yourself a nice deer hock, preferably a fresh one. This particular one is about 10 days old (from being cut off the deer) but was stored in a baggie and buried under the snow, so for all intent and purposes, it's *fresh*.
Also, be ready to make a LOT of mess, especially with your first try. The first time I skinned a deer hock it took me close to 2 hours, but after a few tries, I can easily skin it in under 30 mins. The trick is NOT to be discouraged, and KEEP ON TRYING! If you've got roomates who are squeamish, best do it outdoors and out of sight LOL. Considering the deer was heavily in rut when we got him, the hocks smells.... rutty! personally I find the smell of deer rut quite pleasant; Eau de Deer!
I usually have a lot of spectators when I work on deer bits ... there's a couple of juvenile magpies who always get excited and wait patiently for me to leave deer scraps for them afterwards. That is if they aren't mobbed by the chickadees and nuthatches first!
 |
| I usually don't use the saw hatchet or scraper at this point, but it's nice to have them ready JUST in case. With most of my projects my mini kukri and the whetstone has served me very very well. |
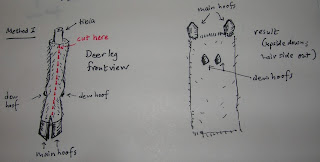
Depending on where you want the hoofs to appear, decide on where to make the initial long incision. If you want:
(1) the Dew Hoofs to be close together, slit the front, along the deer tibia all the way down to the cleft between the main hoofs.
(2) In my case, I prefer to have the dew hoofs on the side, with the main hoofs in the middle, thus I incised down the back of the tibia, almost to the soft tissue between the two dew hoofs.
Here's a couple rough sketches on what I was nattering above:
It depends on how you normally skin, I guess, but I have always found that it's easier to cut the slit down 1 inch at a time, then pull the edges down towards the hoof, and quickly sliding the knife around the bone through stretched tissues. That way I can usually skin most of the hock down to the dew hoof in about 5 minutes.
 |
| Imagine unzipping a jacket around the deer tibia, and using your knife to separate the bone and skin. |
 |
| Basically do the same when you reach the ankle joint. |
Once you reached the ankle is where it gets a bit trickier. Skin around as much as you can until you expose the joint where the needle bone (I think that's what they're called) joins the sides of the tibia. There's one on either side, as this bone is what connects the dew hoofs to the main skeleton.
Skin the hock until you very nearly reach the point where the dew hoof and hide meet. At this point, take a break and admire your work (you've worked hard!) and try to visualise how the needle bones are connected to the tibia ... feel around with your fingers, move the dew hoof and try to locate the joint. It feels like a little grove-y knucle-y ring. Now, place the edge of your knife and severe the ligaments that holds the needle bone and the tibia at the tibia/long pastern joint (in horses it's called the "fetlock joint"). Should be a fairly easy cut.
 |
| Skin the leg until you nearly reach the dew hoof ... and feel around for the joints |
 |
| Can you see the joints? They two bumpy protuberances on either side of the tibia. Look closer and you can see the groove ringing the joint as well. Place your knife blade there! |
 |
| An EASY cut once you've located the right place. |
Once you've separated the joints that connect the needle bones from the tibia/long pastern joint, slice between the needle and long pastern, working carefully down until the skin with the needle bone (and dew hoofs) are detached from the the long pastern.
 |
| see that the skin, with the dew hoof and needle bone are well off the long pastern. |
Now, take a deep breath and start skinning downwards. It gets a bit harder here, as you have to work down and expose the full length of the flexor tendon that underlines the long pastern. You'll be removing a lot of cartilageneous tissues as well.
 |
| Expose the flexor tendon |
Now flip the leg on it's side and continue skinning the front of the leg until you meet the fold of skin that comes between the hoof toes.
 |
| Skin the front of the leg until you meet the skin fold |
 |
| Don't be afraid! It looks messy, but it's worth the work. |
Stop for a bit, and place the leg on your lap with the back facing up. Carefully, with your knife blade facing you, insert the blade into the foot pad, the point between the skin and paddy tissues, and cut further down towards the hoof, be careful not to poke a hole into the opposite skin fold on the front of the leg. It is a bit tricky - took me 3 leg skinning to figure out this trick.
When you're done, hold up the hock skin and you can see the dew hoofs on the side, hoofs in the front and the tibia bone just hanging down behind it
Nearly there!
Drape the tibia on your lap and pull the skin away towards the hoof (you know, like peeling a banana) and skin on the front of the leg, you know. the tricky fold between the long pasterns. This, I found, is the hardest part in the leg skinning. I kept puncturing the fold. Skin as far down towards the hoof as possible, as remember, we have to remove the short pastern and coffin bones later on!
 |
| Yeah, I accidentally poked a hole in the fold. You can see the hair follicles in that but between the long pasterns. |
Just so I don't have to deal with the tibia any longer, I separate the project from the tibia at the fetlock joint. Just cut between the tibia and long pasterns. Don't stab yourself LOL, it's a bit harder going than cutting the needle bone joint.
 |
| There's a lot of cartilage, joint capsule, tendons and ligaments as this is a load bearing joint, unlike the dew hoofs. Just be patient! |
|
 |
| Aaaand we're through! |
I saved the tibia to render oil from the marrow, as I'm a cheap bastard and don't want to pay big bucks for good quality Neatsfoot oil when I can make my own deersfoot oil.
As I'm skinning 8 of these, I stop at this point, put the hock skin with them bones still in it in a baggie and pop them in the freezer for when I can sit down and skin and de-bone all 8 in one sitting. If you recall my previous tutorial, it takes a bit of work to debone the hoof, so I'd rather do it indoors with good music playing ... and be warm. It's -7 deg C today and I'm getting a bit chilly :)
 |
| Long and short pasterns, coffin bone and needle bone yet to be removed! |
 |
Watch this space .. will be posting another tutorial on how to skin and debone!
|
Of course, if you're interested in only keeping the dew hoofs and not the main hoof, you can start cutting the hockskin just at the boundary where hoof starts and hide ends, and start separating the bones out. If you're keeping the hoofs, then leave it as is and wait for the next step ....
Other links that might interest you:
Deer hock pouch
Deer hock pouch, iteration 2; with belt loop
Bark tanning hair on deer hide
Softening bark tanned hair on deer hide
How to remove the pasterns and coffin bone from a deer foot
Salt Curing deer hides for storage
How to degrease deer bones for making tools
Alum tawing white tail hair on neck skin
Soap/Oil tanning hoof-on, hair-on, Mule Deer hockskin
Processing green deer hide into .... Wild Foods: Compilation


Time for the next Step yet??? :)
ReplyDeleteHi Lee, just cross-linked some of the related older posts into the bottom of the pages. Also working on the hockskin today. Decided this time round to leave the coffin bone in but removed both pasterns. Will post in a bit!
ReplyDelete